
Keyboard Shortcuts
Likes
- Felderownersgroup
- Messages
Search
|
Re: Help needed with shaper setup
开云体育Hi David: ? Wow, I was not aware of Steve Rowe’s video on making a back-fence. Really clearly outlines the principles and I’m already sharing this video with friends who wish they had bought the Thickness Stop when it was available. Thanks for sharing the link. ? (And well done Steve!) ? Warm regards, Lucky ? From:
[email protected] <[email protected]> on behalf of David P. Best <dbestworkshop@...> ?
? You should be able to offset your outfeed fence to properly support the more-narrow profiled section coming off the cutter. ?By staggering the fence offsets you can ensure the full profile is cut and still get the support of the material against the fence on both sides of the cutter. ?Of course you’ll have to take this into consideration during stock prep by making the material slightly wider to accommodate. ?I always leave the styles slightly over-width and then trim the outside edge of the door to fit after glue-up, rather than trying to build it to 0.5mm tolerances. ?I also leave the styles over-length and trim top and bottom of the door after glue-up. ?If the widths of the door styles and rails vary by a mm or two, you’re not likely to see that on something like a kitchen cab or vanity. ?But that’s just me - lots of ways to skin this cat. ?If you want to dialog about workflows, DM me - I have a number of videos that go into this topic. ? Personally, I would not run the inside profile without a power feeder - too dangerous. ?You may also discover that the standard feeder wheels are too wide to run cabinet door styles and rails. ?For this application I use narrow wheels on the feeder. ? ? You can easily make your own back-fence from a sheet of plywood secured to the locked sliding table. ?Fellow FOG member Steve Rowe has a nice video about this you can see here: ?. Note that you can also secure the back-fence to the sliding table T-slots using a couple bolts into T-nuts below. ? ? ? David Best |
|
Re: Help needed with shaper setup
开云体育
You should be able to offset your outfeed fence to properly support the more-narrow profiled section coming off the cutter. ?By staggering the fence offsets you can ensure the full profile is cut and still get the support of the material against the fence on both sides of the cutter. ?Of course you’ll have to take this into consideration during stock prep by making the material slightly wider to accommodate. ?I always leave the styles slightly over-width and then trim the outside edge of the door to fit after glue-up, rather than trying to build it to 0.5mm tolerances. ?I also leave the styles over-length and trim top and bottom of the door after glue-up. ?If the widths of the door styles and rails vary by a mm or two, you’re not likely to see that on something like a kitchen cab or vanity. ?But that’s just me - lots of ways to skin this cat. ?If you want to dialog about workflows, DM me - I have a number of videos that go into this topic. ? Personally, I would not run the inside profile without a power feeder - too dangerous. ?You may also discover that the standard feeder wheels are too wide to run cabinet door styles and rails. ?For this application I use narrow wheels on the feeder. ? You can easily make your own back-fence from a sheet of plywood secured to the locked sliding table. ?Fellow FOG member Steve Rowe has a nice video about this you can see here: ?. Note that you can also secure the back-fence to the sliding table T-slots using a couple bolts into T-nuts below. ? David Best DBestWorkshop@... https://www.flickr.com/photos/davidpbest/collections/ https://www.youtube.com/@David_Best |
|
Re: Sheet good recommendations
开云体育Hi Bob: ? I am not strictly familiar with “light marine plywood” from BGB but if it is reasonably priced (sub-$100 AUD) then I’m assuming it is light-weight pine which is nowhere near as sturdy as the hardwood marine plywood variety that runs to several hundred AUD per sheet. If the numbers work out, I’d consider laminating (glue, screw) sheets together, or else you’ll need to think about a hardwood stiffener for shelves. Horses for courses … ? Warm regards, Lucky ? Dr David Luckensmeyer ? From:
[email protected] <[email protected]> on behalf of Bob Wise <bob@...> Great discussion.... at risk of a slight hi-jacking of the thread, how do you think the light marine plywood from BGB would work for shop shelving? I'm about to embark on some storage upgrades. ? ? On Sun, Feb 4, 2024 at 2:47?PM David Luckensmeyer <dhluckens@...>
wrote:
|
|
Re: Help needed with shaper setup
As usual, I greatly appreciate the input of this group. Yes, David, the spindle was tilted. Not sure how that happened as I never adjust that, but it was off vertical. I swept it anyway and got even front, right, and back but 0.06mm high on the out feed side. That's weird, but probably within tolerance.?
Joe, this is the Amana SC542 cutter set. It cuts a full profile, including the tenon. I had adjusted the fence for the profile cut but had not checked the cope. It was indeed about 3mm short. So, moving the fence back to get a full tenon on the cope cut now yields a terrible snipe on the profile cut. So much for the idea that these cutters are a matched set that can be used in a stacked arrangement.? It appears that I'll have to do different setups for copes and then change everything and set back up for the profiles. That's hardly convenient. Am I missing something? Pictures: the joint is now flat, but the tenon is still ever so slightly short. I might need to back the fence up slightly.? Without using a back fence (which I don't have), I'm concerned about changing the width of my stock. Also, it looks like I should get the 240V supply hooked up so I can use this F38 power feeder. I really wish it was 120V. |
|
Re: Help needed with shaper setup
Couple questions - are you removing the whole edge on both the cope cut and the profiling cut?
It looks like from the pictures your tongue is way short. Hard to see in the picture. Does the cope cutter cut the end of the tongue? Set like that can be a little tricky to set. |
|
Re: Help needed with shaper setup
开云体育I’ll hazard a few guesses:
I would first start by checking your spindle angle: put a dial indicator on a mag base on the naked spindle an indicate a circular pattern around the cast iron top as shown below. ?If the spindle is perpendicular to the cast iron top, the indicator will yield zero (or close to zero) variation as you rotate the spindle by hand (using the belt to rotate the spindle). I would also check the height of your sliding table relative to the cast iron top and reporting back. ?If it’s excessive, you might be able to correct this by either shimming the bottom of your coping sled where it rests on the cast iron top, or tilting your spindle backward (which would be tedious and require some trigonometry to figure the proper angle to offset the angled sled base. ? Try this experiment: ?Put your rail component on the cast iron top laying right to left against the shaper fence, then butt your coped material into the profiled of the rail with it laying across the sliding table. ?Do the joints mesh in a tighter manner? ?If so, the cope cut is indeed angled because the material is not coplanar to the cast iron top (because the sliding table is too high). David Best DBestWorkshop@... https://www.flickr.com/photos/davidpbest/collections/ https://www.youtube.com/@David_Best
|
|
Help needed with shaper setup
I am confused by a problem I'm running into. I am setting up the KF700 with a set of Amana cope and stile cutters. I have the stile cutter on the bottom and the cope on top with about 40mm of spacers between them. I am cutting the cope end using my Woodpeckers coping sled.?
I have a problem where it appears that the "back" of the cope joint is interfering before the top. I've never had a problem like this using similar cutters on the router table. The result is that the joint doesn't sit flat, but has a shallow angle. If I press both pieces down to the table, I get a gap on the "front" of the joint of 0.6mm.? Both pieces are square when I set them in my Starrett square.? So, any suggestions on what I'm doing wrong? I'd really prefer to make my cabinet doors on the Felder than to break out the router table again.? |
|
Re: Felder K700S (and others) Wenge Zero Clearance Inserts
开云体育Hi Steve, I assume you are asking for the 45 deg as the blade can be raised for 90 deg kerf. I was cutting a scarf joint on 9’ long walnut boards that were 1’ wide. One piece had to be cut upside down and I was concerned with tearout. I just cut it and it turned out fine.??So I probably won’t not dealt with it until I need it next time. I assume this is easy when making on CNC unless one is looking for the exact kerf width for zero clearance. I don’t really need zero clearance, just don’t like small slivers falling below table. Imran Malik On Feb 11, 2024, at 7:55?AM, Steven B <sb@...> wrote:
?Imran, how did you make the cut for the scoring blade? Steve |
|
Re: Felder K700S (and others) Wenge Zero Clearance Inserts
开云体育Steve,Well done. So I use 2, one for straight cuts and the other, that allows the blade to tilt all the way to 45 deg. Few months ago I realized that, on my saw, there is no way?to make the angled blade opening using?the scoring blade itself. With saw aggregate turned to an angle, I can’t reach the nut to raise the blade. So electronic control has a benefit. Obviously, the job can be done using a different method. Imran Malik On Feb 10, 2024, at 5:40?PM, Steven B <sb@...> wrote:
?Feeling a bit impatient as I destroyed my throat plate a few days ago, I went ahead and modeled up the ZCI and cut a few on the Shapeoko. I made one from 9mm baltic birch and another from a scrap of quartered walnut that happened to be the perfect size. Steve <IMG_5026.JPG> <IMG_5030.JPG>
|
|
Re: Felder K700S (and others) Wenge Zero Clearance Inserts
开云体育Nice Job!Bill B On Feb 10, 2024, at 15:40, Steven B <sb@...> wrote:
|
|
Re: Felder K700S (and others) Wenge Zero Clearance Inserts
Feeling a bit impatient as I destroyed my throat plate a few days ago, I went ahead and modeled up the ZCI and cut a few on the Shapeoko. I made one from 9mm baltic birch and another from a scrap of quartered walnut that happened to be the perfect size.
Steve |
|
Re: feedback on embedded router in table
Great thread, I've got a bunch of bits ordered, I'll post pics when I'm done! On Sat, Feb 10, 2024 at 5:51?AM imranindiana <imranindiana@...> wrote:
|
|
Re: feedback on embedded router in table
开云体育Michael,Router spindle was on sale not long ago. It was almost a 1/3 off. May want to check Felder Eshop if it is still on sale. Now there are 2 models for recent machines and you will pick one for machines after 2004. I am not sure if one on sale is for pre or post 2004 machines. Imran Malik On Feb 10, 2024, at 8:29?AM, Michael Branning <mtbranning@...> wrote:
? Wow, this group is GREAT. I’ve been on about a month and I’m learning so much. Thank you to everyone that offers up their advice. I’m a hobby woodworker that is finally finding the time to seriously build out the woodshop and optimize it. I purchased a lightly used KF700S (2012 build) from a friend and have just started using it. ? I have never used a shaper and plan to start learning that soon. In the meantime, I’m thinking about eliminating my free standing Jessum router table to open up some floor space. I have a Sawstop ICS saw and considered adding the router table extension, but now I’m seeing there is a router spindle for the shaper. That seems like a good alternative, but don’t know the pros/cons of using it vs a router table. I searched Youtube but nothing meaningful found. I’d appreciate some advice on this topic. In return, I’ve just installed a Grit Automation system on my dust collection and would be happy to answer questions on it.? Regards, Michael Branning Cross Anchor, SC On Feb 10, 2024, at 8:17?AM, imranindiana <imranindiana@...> wrote:
|
|
Re: feedback on embedded router in table
This topic was discussed in 2019. If you search "KF700 Spindle Change", you can find the conversation. Here below was my response in the thread. Now, I have the Incra router lift with Porter-Cable 7518, very happy with it. I already sold the Bosch router. ----------------------------------- I have a Bosch 2.3 HP router ?() with the fixed base in the router table. Although you do not need the router lift, it has its problem related to retaining ring , the retaining ring came off on my Bosch router too. It is not a good design. I replaced the retaining ring with split collar The height adjustment is not smooth, simply cannot compare to a good router lift. Also, when the dust gets into the switch and fixed base housing, the router stops running. I think I already cleaned the dust at least 3 times. So my conclusion is : DO NOT use the Bosch router with the fixed base in the router table. I will replace the Bosch router with Porter-Cable 7518 with the Jessem router lift I bought before. ------------------------------------ James On Sat, Feb 10, 2024 at 8:17?AM imranindiana <imranindiana@...> wrote:
|
|
Re: feedback on embedded router in table
开云体育Wow, this group is GREAT. I’ve been on about a month and I’m learning so much. Thank you to everyone that offers up their advice. I’m a hobby woodworker that is finally finding the time to seriously build out the woodshop and optimize it. I purchased a lightly used KF700S (2012 build) from a friend and have just started using it. ? I have never used a shaper and plan to start learning that soon. In the meantime, I’m thinking about eliminating my free standing Jessum router table to open up some floor space. I have a Sawstop ICS saw and considered adding the router table extension, but now I’m seeing there is a router spindle for the shaper. That seems like a good alternative, but don’t know the pros/cons of using it vs a router table. I searched Youtube but nothing meaningful found. I’d appreciate some advice on this topic. In return, I’ve just installed a Grit Automation system on my dust collection and would be happy to answer questions on it.? Regards, Michael Branning Cross Anchor, SC On Feb 10, 2024, at 8:17?AM, imranindiana <imranindiana@...> wrote:
|
|
Re: feedback on embedded router in table
开云体育Hi David, This thread reminded me that I have one of these millions that you produced. Used once and then I got router spindle. I need to find it and put it up for sale. I did mention it to Bob in a private conversation but he had already ordered the router lift. Imran Malik On Feb 10, 2024, at 12:55?AM, David P. Best <dbestworkshop@...> wrote:
?Bob, have you seen the attached? ?It’s been in the archives for 20+ years. ?I sold millions of ‘em. ?LOL. Today, I would use a cordless router. David Best DBestWorkshop@... https://www.flickr.com/photos/davidpbest/collections/ https://www.youtube.com/@David_Best
<Router Adapter System for Felder KF F700.pdf> |
|
Re: feedback on embedded router in table
开云体育Bob, have you seen the attached? ?It’s been in the archives for 20+ years. ?I sold millions of ‘em. ?LOL. Today, I would use a cordless router.David Best DBestWorkshop@... https://www.flickr.com/photos/davidpbest/collections/ https://www.youtube.com/@David_Best
|
|
Re: feedback on embedded router in table
Bob, I have posted router-table-in-slider pics before, so this is for those who have not seen them. Note that my machine is a short stop (1250mm) Hammer K3, and there are differences in the respective designs. Nevertheless, there may be some ideas here for you.
The router table lies in a panel added to the outfeed. This is made from an off-cut from a kitchen bench. This is compressed (hard) and waterproof (no movement or expansion).? This is the space available ...  And this is the build ..  Originally the fence (which I built) ran in its own track. Later I connected it to the rip fence, where it takes advantage of the micro adjuster and digital gauge ...  The fence just sides on-and-off as needed. There is dust collection from both below- and above the table ...  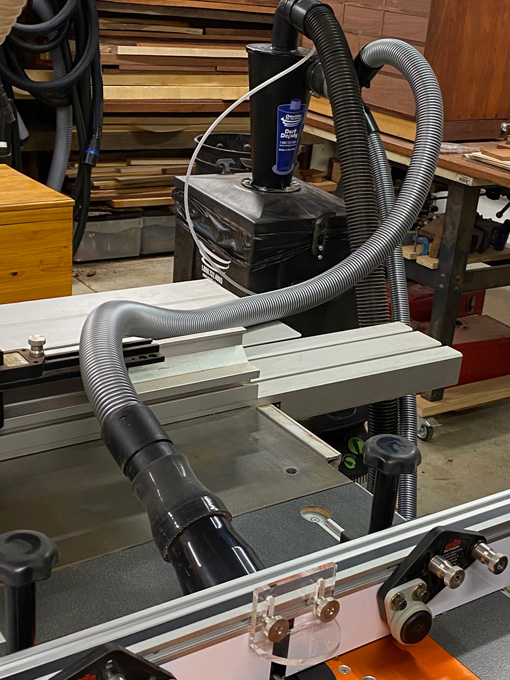 The hose comes from Festool ...  The other useful item is a flip-up Wixey digital depth gauge. This is on the left front of the table ...  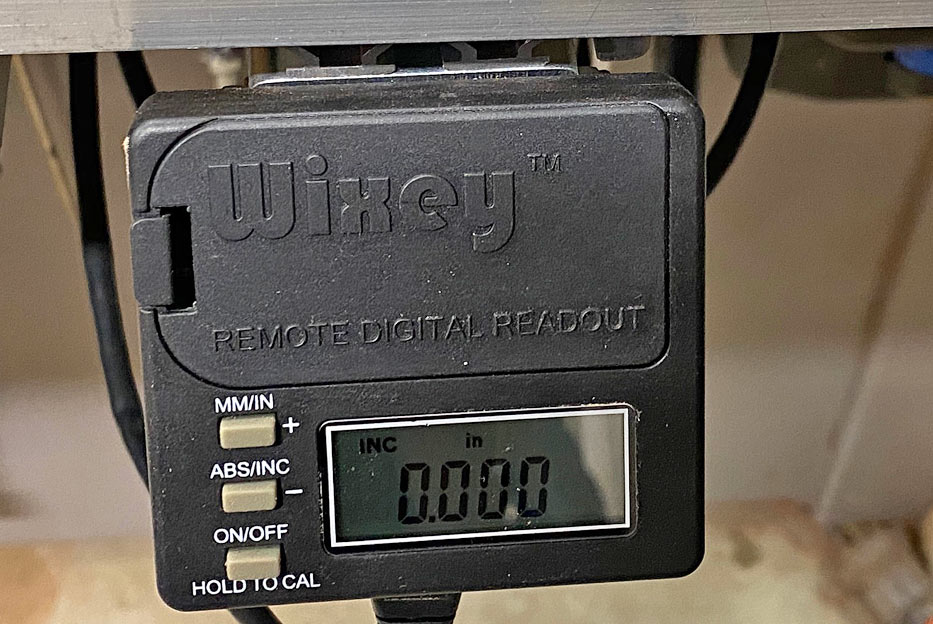 When not in use, the router table fence hangs above the slider ...  Details of the build are here:?? Hope this helps. Regards from Perth Derek |