"Loved this. See my pic (really need to improve the food
photography)."
20-Minute Apple Spinach Salad with homemade maple-lime mustard
dressing will make a healthy and refreshing addition to your
favorite weeknight dinner! The addition of fruit, nuts, and
cheese elevates this simple spinach salad to a
Recipe Type: Salad
Total Time: 20 min
Prep Time: 20 min
Ingredients:
1/3?cup
extra virgin?olive oil
3?tablespoons
Dijon?mustard
3?tablespoons
maple syrup
1
large?lime?(juice freshly squeezed)
6?ounces
baby?spinach
1?cup
pecans?halves (toasted, some of
them chopped finely)
1/2?cup
dried?cranberries
1
small green?apple?((Granny Smith), cored and
diced)
1
small red?apple?((such as Fuji or Gala),
cored and diced)
1/3?cup
goat?cheese?(crumbled)
Directions:
Make
salad dressing
Combine all salad dressing ingredients in a mason jar. Whisk
well with a fork, until emulsified. Add more lime juice to
taste.
Assembly
I prefer to arrange the salad in individual bowls for
presentation purposes.
Add spinach to each individual salad bowl. Chop up half of the
nuts. Nestle the remaining salad ingredients on top of the
spinach.
Drizzle with the salad dressing.
Alternatively, you can combine all the salad ingredients
(except pecans) in a large serving bowl, add the dressing, and
toss to combine. Then, top the salad with toasted pecan halves
(some of them chopped).
Two times the chocolate makes these?Chocolate Mocha Muffins?the perfect breakfast choice to get you going in the morning. Grab a cup of coffee and a muffin before heading out the door.
Prep Time15 minutes
Cook Time16 minutes
Total Time31 minutes
Ingredients
1/2 cup unsalted butter, softened
1/3 cup brown sugar
1/3 cup granulated sugar
1 large egg
2 teaspoons vanilla extract
1 cup sour cream
1/3 cup milk
1/3 cup strong brewed coffee, cooled
2 teaspoons baking powder
1 teaspoon baking soda
1 teaspoon table salt
1/2 cup dark cocoa powder
2 cups all purpose flour (240g)
1 1/4 cups mini chocolate chips, divided
Instructions
Preheat the oven to 400°F. Place 16 cupcake liners in two cupcake pans.
Beat the butter and sugar until fluffy. Add the egg, sour cream, and vanilla and beat until creamy.
Sift the dry ingredients and add them alternately with the milk and coffee, beating slowly. Do not overmix.
Stir in 1 cup mini chocolate chips by gently. Spoon the batter evenly into the cupcake liners.
Sprinkle the tops of the batter with the remaining chocolate chips. Bake for 15-17 minutes or until a toothpick inserted in the center comes out mostly clean.
Remove the muffins from the oven and let them cool in the pan for 2-3 minutes. Then, place the muffins on a wire rack to cool completely. Store in a sealed container.
Notes
Substitute other liquids.?If you do not like coffee or do not want any caffeine in your baked goods, you can substitute milk or water for it.
Do NOT over-mix your batter.?Overmixing the batter can make your muffins tough.
Skip the paper liners.?Spray the muffin pan with nonstick baking spray, then use a paper towel to wipe out the excess before filling it with batter.
Fill them neatly.?Spoon the batter into the prepared pan using a large cookie or ice cream scoop.
All ovens run differently.?Before the timer goes off, check the muffins by inserting a toothpick in the center. They are done when the toothpick comes out with a few moist crumbs.
Place a muffin?in the microwave?for 10 seconds for that fresh from the oven taste.
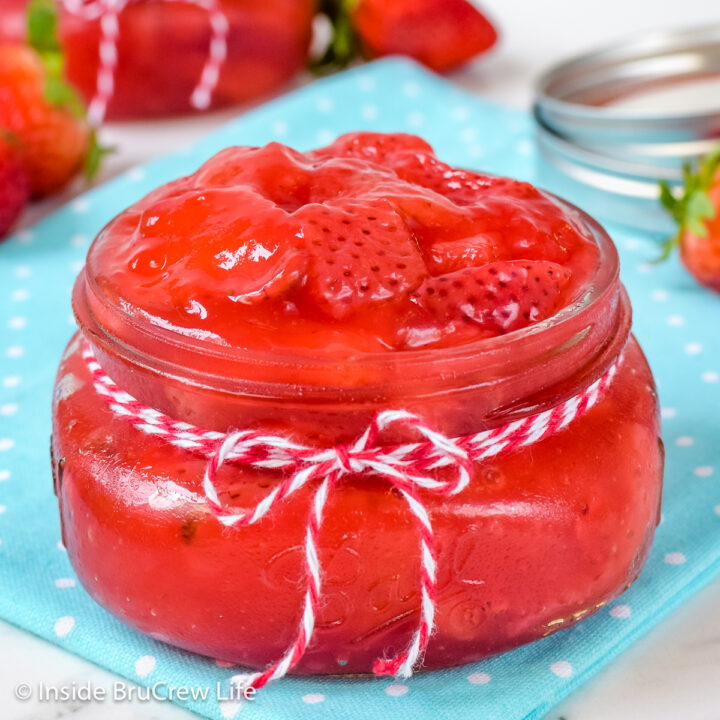
In just 15 minutes you can make a delicious?Strawberry Pie Filling?that has a vibrant red color and is bursting with flavor.?This pie filling recipe is easy to make using 5 simple ingredients and is great for pies, cakes, cheesecake, or breakfast pastries.
Prep Time15 minutes
Total Time15 minutes
Ingredients
5 cups sliced fresh strawberries (24 ounces)
2 tablespoons lemon juice
3/4 cup granulated sugar
1/4 cup cornstarch
1 1/4 cup water
1 - 3 ounce box strawberry Jell-O powder
Instructions
Stir together the strawberries and lemon juice. Set aside.
Whisk together the sugar and cornstarch. Stir it into the water in a large saucepan and heat over high heat until the mixture turns clear and starts to bubble.
Remove the pan from the heat and stir in the Jello powder until dissolved.
Add the sliced strawberries and stir until completely coated in the gel mixture.
Let the mixture cool on the back of the stove or counter for 1-2 hours, then refrigerate until chilled all the way through.
Keep refrigerated in a sealed container for 4-5 days. It can also be frozen if you want to keep it longer.
Notes
Avoid lumps.?In order to avoid lumps in your glaze, whisk together the cornstarch and sugar ahead of time. This will ensure a smooth consistency when the filling is finished.
Adjust the amount of sugar.?If your berries taste extra sweet, use less sugar in the filling.
Do not overcook the glaze.?Cornstarch starts to break down with too much heat. If this happens, your filling will not be as thick or firm when it chills.
Use ripe strawberries.?The natural sweetness from the strawberries will shine through and give the filling a delicious flavor. Avoid berries that are mushy or moldy.
Add other fresh fruit.?Use any mixture of sliced strawberries, raspberries, blueberries, or blackberries to change it up.
Prevent a skin from forming.?Place a piece of plastic wrap right on top of the filling while it is hot.
Cool before using.?This allows the pie filling time to set up and thicken before adding it to other desserts.
Want to can the filling??Use clear-jel instead of cornstarch, if you are going to can the filling.
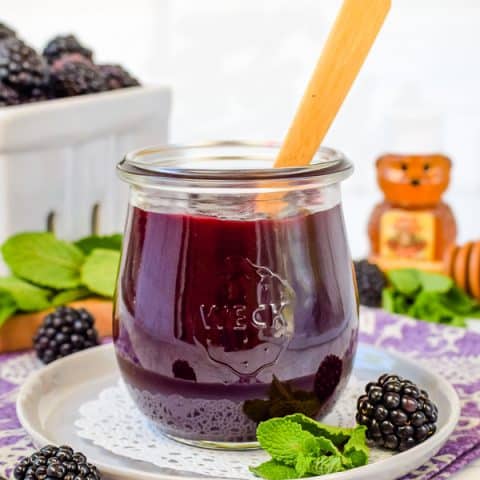
A jar of Homemade Seedless Blackberry Preserves only takes minutes to make. It's delicious on toast, yogurt parfaits, ice cream, or breakfast pastries.
Prep Time10 minutes
Cook Time5 minutes
Total Time15 minutes
Ingredients
12 ounces blackberries (fresh or frozen, see note below)
1 Tablespoon cornstarch
2 Tablespoons honey
Instructions
Place the berries in a saucepan over low heat. Stir and heat until they soften and release their juice.
Mash the berries with a fork or potato masher. Remove the pan from the heat.
Press the mixture one spoonful at a time through a fine mesh sieve to remove the seeds. Use the back of the spoon to press the berry mixture through. You should get about 3/4 cup juice.
Mix 2 Tablespoons of the juice with the cornstarch.
Place the rest of the blackberry juice in the pan with the honey. Slowly stir in the cornstarch mixture. Heat over medium heat until thickened. (about 4 minutes)
Remove the pan from the heat and let cool before placing in a jar and refrigerating.
Notes
*If you use fresh blackberries, add 2 Tablespoons of water to the pan when you cook them down.
**If you use frozen blackberries, thaw partially and drain the excess liquid before cooking. Do not add an additional water because the frozen berries will have some.
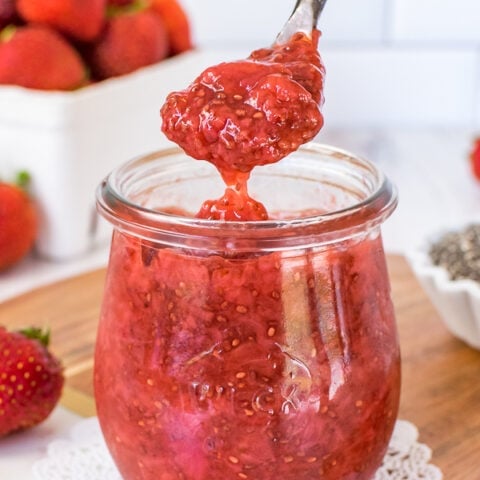
This sweet?Strawberry Chia Jam?is a delicious and healthy alternative to store bought jams and jellies. It is easy to make, tastes great, and uses all natural ingredients.
Prep Time15 minutes
Total Time15 minutes
Ingredients
3 cups diced fresh strawberries
1 1/2 Tablespoons lemon juice
3 Tablespoons honey
1 1/2 Tablespoons chia seeds
Instructions
Heat strawberries and lemon juice in a pan over medium heat until berries release their juices.
Crush berries with a fork. Bring mixture to a boil.
Reduce heat and simmer 10 minutes.
Remove from heat; stir in honey and chia seeds. Let cool before refrigerating.
This custard-based German Buttercream is perfect for those who prefer their frosting to be not-so-sweet. Silky and soft, it pipes beautifully and pairs well with any flavor cake.Recipe includes a how-to?video!
CourseFrosting
CuisineGerman
Prep Time40minutes?minutes
Cook Time15minutes?minutes
Cooling Time2hours?hours
Total Time2hours?hours?55minutes?minutes
开云体育s12?servings (frosting makes enough to generously cover 12 cupcakes or frost one 13x9” cake or a two-layer 8” or 9” round cake)
Calories346kcal
Author
Equipment
Ingredients
For Pastry Cream
1?cup?(236?ml)?whole milk
1?cup?(236?ml)?heavy cream
5?large egg yolks?discard whites or see note for ideas on how to use leftover egg whites
??cup?(133?g)?granulated sugar
??tsp?table salt
3?Tablespoons?cornstarch
4?Tablespoons?(57?g)??cut into 4 pieces
1 ??teaspoons?
For Frosting
1?cup?(226?g)??softened (but not so soft that it’s melty/oily)
??cup?(63?g)?powdered sugar?optional
Instructions
For Pastry Cream
In a medium-sized bowl, whisk together milk, cream, and egg yolks until thoroughly combined.
1 cup whole milk,1 cup heavy cream,5 large egg yolks
In a medium-sized saucepan, whisk together sugar, cornstarch and salt. While still whisking, drizzle cream mixture into sugar mixture until thoroughly combined and no lumps.
? cup granulated sugar,? tsp table salt,3 Tablespoons cornstarch
Cook over medium heat, stirring constantly, until mixture thickens to a pudding-like consistency and coats the back of a spoon.
Remove from heat and pour through a fine-mesh strainer into a heatproof bowl. Whisk in butter, 1 Tablespoon at a time, and then stir in vanilla extract.
Place a piece of plastic wrap or parchment paper directly against the surface of the pastry cream and transfer to the refrigerator to cool completely. Once the cream has cooled and you are ready to prepare your frosting, you will need to remove the pastry cream and your butter from the refrigerator and allow them to warm nearly room temperature (not too warm so that the butter is becoming oily, though).
For German Buttercream
NOTE: (Pastry cream and softened butter must be the same temperature in order to proceed)
Place softened butter in the bowl of a stand mixer (or you may use a large bowl and an electric mixer) and use a whisk attachment to beat butter on high speed until fluffy and lightened in color (about 3-5 minutes).
1 cup unsalted butter
Reduce mixer speed to medium and begin to gradually add pastry cream, one spoonful (approximately 1-2 Tablespoons) at a time, allowing the first spoonful to be completely incorporated before adding the next.
Once all pastry cream has been added, slowly increase mixer speed to medium-high and beat until you have a fluffy frosting.
Taste frosting, stir in powdered sugar if desired, then pipe (I used an Ateco 848 piping tip) or spread over cake/cupcakes.
? cup powdered sugar
Notes
Troubleshooting
Please see the "troubleshooting" section above the recipe if you are having any problems with your buttercream splitting or curdling.
Making in advance/storing
German buttercream should be kept cold in the refrigerator. It will keep for up to one week. If not using right away, store in an airtight container. You will need to soften at room temperature and may need to whip again before piping/spreading. I have not personally frozen this buttercream and am not sure how it would hold up to being frozen, but pastry cream does not typically fare well in the freezer.
A sweet and tangy refrigerator pickles recipe! This old-fashioned favorite is perfect for using up a surplus of fresh cucumbers from the garden. Only 15 minutes to make!Recipe includes a how-to?video.
CourseAppetizer, Side Dish
CuisineAmerican
Prep Time10minutes?minutes
Cook Time5minutes?minutes
Chilling Time4hours?hours
Total Time4hours?hours?15minutes?minutes
开云体育s12?? cup servings
Calories106kcal
Author
Equipment
Ingredients
3?cups?(300?g)?thinly sliced? cucumbers?this was about 2 cucumbers for me
1?cup?(80?g)?thinly sliced white or yellow onion?this was about 1 small onion for me
1 ??cups?(355?ml)?white vinegar
1 ??cups?(300?g)?granulated sugar
??teaspoon?salt
??teaspoon?celery seed
??teaspoon?mustard seed
??teaspoon?ground turmeric
Instructions
Place cucumber and onion slices in a medium-sized heat-proof bowl and set aside.
3 cups thinly sliced? cucumbers,1 cup thinly sliced white or yellow onion
Combine all remaining ingredients in a small saucepan and stir well.
Cook over medium heat, stirring frequently, until sugar is dissolved.
Bring to a boil then remove from heat.
Pour vinegar mixture over cucumbers and onions, stir so that all cucumbers and onions are coated with brine.
Allow to cool at room temperature for about 10 minutes, then cover and transfer to refrigerator.
Allow to chill overnight (or at least for 4-6 hours, so the flavor can fully develop) before enjoying.
Notes
?Slicing
The thinner the better! A mandolin makes this quick and easy (and all of your slices will be consistent thickness), I link to my favorite mandolin in the "equipment" section above.
Storing
Refrigerator pickles will keep for up to several weeks in the refrigerator in an airtight container.
Make and
share this Ricotta Cake recipe from Food.com.
Author: Submitted by X in Bayside, NY
Recipe
Type: Dessert
Total Time: 1 hr
Prep Time: 10 min Cook Time: 50 min
Ingredients:
1
(18 1/4 ounce) box?yellow cake mix
1
cup water (or as
specified in cake?mix?directions)
1/3
cup oil (or as
specified in cake?mix?directions)
2?
to 3
?eggs (or as
specified in cake?mixes?directions)
2
lbs?ricotta cheese
4
eggs
1
cup?granulated sugar
1
teaspoon vanilla
1
teaspoon?lemon?juice
Directions:
Preheat
oven to 350 degrees. Prepare cake mix according to package
directions and pour into well greased 9"x13" pan.
Mix
cheese, eggs, sugar, vanilla, and lemon juice together and
pour over cake batter. Bake 50-60 minutes until brown on
top. ** The cake and cheese mixture will switch during
baking.
Can
be topped with berries and whipped cream or confectioner's
sugar and/or cinnamon.
Source:?
Ginny Butterfield
Cranberry Twp, Pa
Arroz con Leche (Rice Milk Pudding) (From Vintage Recipe Cards)
You will need:
1 cup rice (uncooked)
3 cups water
3? cups milk
? teaspoon salt
1 stick cinnamon
2 egg yolks, slightly beaten
? cup sugar
? cup raisins
? teaspoon grated lemon rind
1 teaspoon vanilla
powdered cinnamon
Wash rice and slowly bring it to a boil in 3
cups of water. Add salt and lemon rind. Cook until soft and
fluffy. Add milk, sugar and cinnamon stick. Simmer over low heat
until it begins to thicken. Remove from heat and stir in raisins
and egg yolks. Simmer over low heat 20 to 30 minutes until creamy,
stirring occasionally. Remove from heat and vanilla [sic]. Pour
into a serving dish. Serve warm or cold sprinkled with cinnamon.
6 pineapple rings (canned or fresh), cut to fit the muffin tin
6 maraschino cherries (optional)
?
For the cake:
1 cup all-purpose flour
1 teaspoon baking powder
1/4 teaspoon salt
1/2 cup granulated sugar
1/4 cup unsalted butter, softened
1 large egg
1 teaspoon vanilla extract
1/2 cup pineapple juice (from the canned pineapple or fresh)
?
INSTRUCTIONS:
1. Preheat your oven to 350°F (175°C). Grease a 6-cup jumbo muffin tin or a 12-cup regular muffin tin.
?
2. Prepare the topping:
In a small bowl, mix the melted butter and brown sugar. Spoon about 1 tablespoon of this mixture into the bottom of each muffin cup.
Place a pineapple ring (or a portion of one that fits) on top of the brown sugar mixture in each cup. If using, place a maraschino cherry in the center of each pineapple ring.
?
3. Make the cake batter:
In a medium bowl, whisk together the flour, baking powder, and salt.
In a separate large bowl, cream together the softened butter and granulated sugar until light and fluffy. Add the egg and vanilla extract and mix until well combined.
Gradually add the dry ingredients to the wet ingredients, alternating with the pineapple juice, mixing until smooth.
?
4. Assemble the mini cakes:
Spoon the cake batter evenly into the muffin cups, filling each about 3/4 full over the pineapple and sugar topping.
?
5. Bake in the preheated oven for 20-25 minutes (for regular-sized muffins) or 25-30 minutes (for jumbo muffins), or until a toothpick inserted into the center comes out clean.
?
6. Allow the cakes to cool in the tin for 5 minutes. Run a knife around the edges to loosen, then carefully invert the muffin tin onto a baking sheet or serving platter. Gently tap the bottom of each muffin cup to release the cakes.
?
7. Serve warm, with the caramelized pineapple topping on display. These mini pineapple upside down cakes are perfect as-is, or with a dollop of whipped cream for extra indulgence!
?
Enjoy these moist, delicious Mini Pineapple Upside Down Cakes for a perfect tropical treat that’s sure to impress!
Macaroni salad with egg is a classic, creamy side dish that’s perfect for barbecues, picnics or family gatherings. The combination of tender pasta, hard-boiled egg and rich, tangy dressing creates a dish that is both comforting and refreshing. The eggs add extra creaminess and protein, while crisp vegetables, like celery and onion, provide satisfying crunch. With a hint of mustard and sweetness from relish, this macaroni salad is flavorful, easy to make and sure to be a hit at any meal.
INGREDIENTS:
list of 12 items
? 2 cups elbow macaroni, cooked and cooled
? 4 hard-boiled eggs, chopped
? 1/2 cup mayonnaise
? 1 tablespoon Dijon mustard
? 1 tablespoon sweet pickle relish
? 1/4 cup finely chopped red onion
? 1/4 cup finely chopped celery
? 1 tablespoon apple cider vinegar
? 1 teaspoon sugar
? Salt and pepper to taste
? Paprika for garnish (optional)
? Fresh parsley for garnish (optional)
list end
INSTRUCTIONS:
list of 6 items
1. Cook the macaroni: Cook the elbow macaroni according to package instructions. Drain and rinse under cold water to cool it down. Set aside.
2. Make the dressing: In a large mixing bowl, whisk together the mayonnaise, Dijon mustard, sweet pickle relish, apple cider vinegar, sugar, salt, and
pepper until smooth and well combined.
3. Add the vegetables and eggs: Fold in the chopped red onion, celery, and hard-boiled eggs into the dressing.
4. Combine with macaroni: Add the cooked and cooled macaroni to the bowl, tossing gently to ensure everything is evenly coated in the dressing.
5. Chill: Cover the macaroni salad and refrigerate for at least 1 hour to allow the flavors to meld.
6. Serve: Before serving, garnish with paprika and fresh parsley if desired.
list end
This Macaroni Salad with Egg is a creamy, flavorful side dish that complements a wide range of meals, from grilled meats to sandwiches, and is a staple
Five-spice chicken is a flavorful dish that brings the bold, aromatic essence of Chinese five-spice powder to a simple yet delicious chicken recipe. The unique blend of star anise, clove, cinnamon, Sichuan peppercorn and fennel seeds infuses the chicken with irresistible depth, balancing sweet, savory and spicy notes. This dish is perfect for those who enjoy Asian-inspired cuisine and is versatile enough to be served with rice, stir-fried vegetables or a fresh salad. Whether grilled, baked or pan-fried, five-spice chicken will quickly become a family favorite for its fragrant, slightly smoky and tender qualities.
1. Marinate the Chicken: In a medium bowl, whisk together the Chinese five-spice powder, soy sauce, hoisin sauce, honey, rice vinegar, sesame oil, garlic,
and ginger. Place the chicken breasts in the bowl, ensuring they are well-coated in the marinade. Cover and refrigerate for at least 30 minutes, or up
to 2 hours for more intense flavor.
2. Cook the Chicken:
list of 3 items nesting level 1
? Grilling: Preheat the grill to medium-high heat. Grill the chicken for 6-7 minutes per side, or until the internal temperature reaches 165°F (75°C).
? Baking: Preheat the oven to 400°F (200°C). Place the marinated chicken in a baking dish and bake for 25-30 minutes, or until fully cooked.
? Pan-frying: Heat a large skillet over medium heat with a drizzle of oil. Cook the chicken for about 5-7 minutes per side, or until cooked through.
list end nesting level 1
3. Garnish and Serve: Once cooked, let the chicken rest for a few minutes before slicing. Garnish with sliced green onions and sesame seeds if desired.
Serve with steamed rice, stir-fried vegetables, or a side salad.
list end
Enjoy the fragrant and savory delight of Five Spice Chicken, perfect for weeknight dinners or special occasions!
Italian-style meat loaf is a savory twist on the classic comfort food, combining the rich flavor of seasoned ground beef with the deliciousness of Italian herbs, garlic and parmesan cheese. This version of meat loaf is enriched by marinara sauce, giving it moist and flavorful texture, while the addition of bread crumbs and eggs ensures a light, tender result. Topped with a generous layer of melted mozzarella cheese and served with a side of pasta or a green salad, this hearty meal is perfect for family dinner or a special occasion. It’s an easy-to-make dish that’s sure to impress with its bold flavor and satisfying appeal.
INGREDIENTS
list of 15 items
1 lb ground beef (preferably 80/20 for the best texture)
1/2 lb ground pork (optional, for added flavor and moisture)
1 cup breadcrumbs (preferably Italian-style)
1/4 cup grated parmesan cheese
1/4 cup fresh parsley, chopped
2 cloves garlic, minced
1 large egg
1/2 cup milk
1 cup marinara sauce, divided (plus extra for serving)
1 teaspoon dried oregano
1 teaspoon dried basil
1/2 teaspoon salt
1/4 teaspoon freshly ground black pepper
1/2 cup shredded mozzarella cheese
Olive oil for greasing
list end
INSTRUCTIONS
list of 6 items
1. Preheat the oven
Preheat your oven to 375°F (190°C) and lightly grease a loaf pan with olive oil or line it with parchment paper.
2. Prepare the meat mixture
In a large bowl, combine the ground beef, ground pork, bread crumbs, grated parmesan, chopped parsley, minced garlic, egg and milk. Stir in 1/2 cup marinara sauce, dried oregano, dried basil, salt and pepper. Mix everything together until well combined, but be careful not to overwork the meat to keep it tender.
3. Form the meat loaf
Transfer the meat mixture in the prepared loaf pan, pressing it gently in the corners to form an even loaf. Spread a thin layer of marinara sauce (about 1/4 cup) over the top of the meat loaf for extra moisture and flavor.
4. Bake the meat loaf
Place the loaf pan in the preheated oven, and bake for about 45 to 50 minutes or until the meatloaf is cooked through (an internal temperature of 160°F or 71°C). If the top starts to brown too much, you can loosely cover the meat loaf with aluminum foil.
5. Add the cheese
About 5 minutes before the meat loaf is finished, sprinkle the shredded mozzarella cheese over the top of the meat loaf. Return the pan to the oven, and bake until the cheese is melted and bubbly.
6. Rest, and serve
Remove the meat loaf from the oven, and let it rest for about 5 to 10 minutes before slicing. Serve with additional marinara sauce on the side, and enjoy with pasta, a fresh salad or roasted vegetables.
These slightly sweetened honey wheat rolls are made with wholesome ingredients like real honey, rolled oats, and whole wheat flour.?They would make a great addition to your Thanksgiving dinner table!
CourseAppetizer, Bread
CuisineAmerican
Prep Time25minutes?minutes
Cook Time30minutes?minutes
Rising Time1hour?hour?20minutes?minutes
Total Time2hours?hours?15minutes?minutes
开云体育s15?rolls
Calories209kcal
Author
Equipment
Glass or ceramic baking dish
Ingredients
For the rolls
??cup?(180?ml)?whole milk
??cup?(60?ml)?water
2 ??teaspoons?active dry yeast
1?teaspoon?granulated sugar
??cup?(75?g)??melted
??cup?(80?g)?honey
2?eggs?lightly beaten
1?teaspoon?table salt
1?cup?whole wheat flour
3 - 3 ??cups?(375-438?g)?bread or all-purpose flour
Honey Glaze
1?Tablespoon?(20?g)?honey
1?teaspoon?warm water
Old fashioned oats?for sprinkling
Instructions
In a small microwave safe bowl or measuring cup, combine milk and water and heat until warmed to 115F (45C).
? cup whole milk,? cup water
Pour milk/water mixture into a large bowl, sprinkle yeast and sugar overtop and stir until combined. Let sit undisturbed until foamy, about 5-10 minutes.
2 ? teaspoons active dry yeast,1 teaspoon granulated sugar
Once yeast is foamy, add butter, honey, eggs, salt, wheat flour, and 1 cup (125g) of bread flour and stir until well combined.
? cup unsalted butter,? cup honey,2 eggs,1 teaspoon table salt,1 cup whole wheat flour,3 - 3 ? cups bread or all-purpose flour
Gradually add remaining flour as needed, until dough begins to cling to itself in a ball and pulls away from the side of the bowl. Knead dough either by hand or with a dough hook on your stand mixer until smooth and elastic (this should take 5-10 minutes).
Lightly grease a large bowl with oil and transfer dough to oiled bowl, turn dough to coat surface entirely with oil, cover bowl with plastic wrap or a warm, damp kitchen towel and allow to rise in a warm place until doubled in size, about 1-2 hours.
After rising
Once dough has finished rising, generously grease the sides and bottom of a 9”x13” glass dish with butter, set aside.
Punch down dough and transfer to a lightly floured surface. Divide dough into 15 equal portions (about 65-70g each) and roll each portion into a ball. Arrange rolls in prepared baking dish, cover, and allow to rise in a warm place until balls are puffed and almost touching, about 20-30 minutes.?Tip:?to tell that the dough is properly proofed, lightly flour your index finger and gently poke one of the rolls. If it springs back completely, it needs more time. If it springs back about halfway, the dough is properly proofed and is ready to be baked. If the dough doesn’t spring back at all, unfortunately it is over-proofed, but bake it anyway.
While dough is proofing, preheat oven to 350F (175C) and prepare honey topping by combining honey and warm water in a small dish and whisking until thoroughly combined.
1 Tablespoon honey,1 teaspoon warm water
Once dough is finished proofing, uncover and use a pastry brush to brush tops of dough balls thoroughly with mixture, then sprinkle lightly with oats and transfer to preheated 350F (177C) oven. Bake for 30 minutes, until rolls are a light golden brown and their internal temperature is 185-190F (88C) (if you are using a metal baking dish, check the rolls earlier, at 24 minutes).
Old fashioned oats
Notes
Can I make the dinner rolls larger?
If you want larger rolls you can divide into 12 rolls, each 85-90g, and bake for 30 minutes, until inside temperature reaches 185-190F (88C).
Storing
Store in an airtight container at room temperature.
Reheating rolls
If you made the rolls in advance and wish to reheat them before serving with dinner, preheat your oven to 300F (150C) place the rolls in a baking dish, lightly spray with a mist of water (or sprinkle a few drops of water on top or brush with melted butter), cover with foil, and heat for 10 minutes or until warmed through. Don’t over-cook or they’ll be dry!
Original recipe
For anyone looking for my original 60-minute recipe,?.
Sourdough cheddar jalape?o bread is the ultimate bread for sandwiches or snacking. This recipe is perfect for sourdough bakers who want to take their bread to the next level!
Before beginning, please note that the dough will need to rise at room temperature until increased 80% in volume – for me this is typically 5-7 hours. After that it will need to ferment overnight in the refrigerator before being baked.
In a large mixing bowl combine starter, water, oil, and honey and stir well until completely combined.
? cup active bubbly sourdough starter,1 ? cup warm water,2 Tablespoons olive oil,2 Tablespoons honey
Add flour, sprinkle salt overtop, and work dough together with your hands or a wooden spoon until it is mostly combined. Dough will be shaggy but should not have any dry patches of flour remaining.
3 ? cups bread flour,2 teaspoons table salt
Cover bowl with plastic wrap and let sit for an hour undisturbed (autolyse).
Once the hour has passed, sprinkle the top of the dough with shredded cheese and jalapenos.
4 oz shredded cheddar cheese,? cup jalapenos
Stretch and fold:?Grasp one side of the dough and stretch it up and then fold it over the opposite side of the dough. Turn your dough 90 degrees and repeat this again three more times, for a total of four stretch and folds. (It’s okay if the jalapenos and cheese are not well distributed at this point, they will become more evenly distributed as we do more stretch and folds.)
Cover the dough tightly with plastic wrap and let sit for 30 minutes. Stretch and fold your dough again as described above. Repeat every 30 minutes until you have done a total of four stretch and folds. After the final stretch and fold, cover dough and let it rise in a warm, draft-free place until it has increased about 80% in size (this will likely take 5-7 hours).
Once dough has risen, lightly oil a medium-sized bowl and place dough into bowl, tucking the ends under to create surface tension on the dough. Cover tightly and refrigerate overnight (up to 24 hours).
The next day, preheat your oven to 450F (230C). Remove dough from refrigerator, turn it out onto a large piece of parchment paper (you’ll want the parchment to be large enough that when placed in the dutch oven you have enough going up the sides to pull the bread out), and lower dough into 4 quart Dutch oven. Score the top of the bread (see note if you want to add jalapenos and cheese on top – don’t add them here). Allow the dough to rest in the Dutch oven while the oven preheats.
Once oven is preheated to 450F (230C), cover the dough with the lid and place in oven for 30 minutes. After 30 minutes, remove the lid and bake for another 23 minutes longer (the internal temperature should reach 205F/96C).
Remove from oven and allow bread to sit in the dutch oven for 10-15 minutes before carefully using the parchment paper to lift it out of the Dutch oven and remove to a cooling rack to cool completely before slicing and enjoying.
Notes
Adding cheese and jalape?o on top
If you’d like to add cheese and jalapeno on top, add them after the first 30 minutes in the oven. Just be quick about it and have the toppings ready to go, the less time the bread is out of the oven the better.
Preventing over-browning on the bottom
Place a baking sheet in your oven and place the Dutch oven on top of the baking sheet when baking to help minimize the chance of the bottom of your bread burning.
Baking in a loaf pan
This bread could alternatively be baked in a loaf pan. You can follow the instructions in my??or simply place in a standard-sized loaf pan and bake as indicated.
Storing
Store in an airtight container or wrap tightly in plastic wrap and store at room temperature for up to 3 days. This bread also freezes well. I like to slice it and wrap the individual slices, then toast them to defrost them.
Soft and chewy with a charred, bubbly exterior, this homemade naan recipe rivals that of your local Indian restaurant! A hot cast iron pan is key for replicating the traditional tandoor cooking method at home.
CourseAppetizer, Bread, Side Dish
CuisineIndian
Prep Time30minutes?minutes
Cook Time2minutes?minutes
Rising Time1hour?hour?15minutes?minutes
Total Time1hour?hour?47minutes?minutes
开云体育s8?servings
Calories239kcal
Author
Equipment
?(I love this skillet - reasonably priced and will last forever)
Ingredients
??cup?(120?ml)?water
3?Tablespoons?milk
2?teaspoons?active dry yeast*?see note on for instant yeast
2 ??cups?(312?g)?all-purpose or bread flour?divided
2?teaspoons?granulated sugar
??teaspoon?baking powder
??teaspoon?table salt
??cup?(60?g)?full fat Greek yogurt
2?Tablespoons?olive oil
2?teaspoons?minced garlic?optional, for garlic naan
For topping (optional but so good!)
4?Tablespoons?(57?g)?salted butter
1?Tablespoon?chopped fresh parsley
2?teaspoons?minced garlic?for garlic naan
Instructions
Make the dough
In a microwave safe dish, warm water and milk until it reaches 100F (38C) (always stir before checking temperature).
? cup water,3 Tablespoons milk
Pour warmed liquid into the bowl of a stand mixer (or a large mixing bowl), add yeast and a pinch of sugar and stir to combine. Let sit for 5-10 minutes until mixture becomes foamy (if it never foams, you’ll need to start over with fresh yeast).
2 teaspoons active dry yeast*
Once foamy, add about 1 ? cups (188g) bread flour, sugar, baking powder, salt, Greek yogurt, olive oil, and garlic (if making garlic naan) and stir until well-combined.
Gradually stir in the remaining 1 cup (125g) flour until dough begins to cling to itself and pull away from the sides of the bowl.
Place bowl on your stand mixer and, using dough hook attachment, knead on low-speed for 4 minutes (alternatively turn the dough out onto a lightly floured surface and knead by hand for about 5 minutes). Knead until dough is cohesive and no longer shaggy (it still may be slightly sticky/tacky, especially if you used the stand mixer – this is good!).?Note that this dough does not become completely smooth and elastic like many yeast breads nor will it pass the “windowpane test”.
Transfer dough to a large, lightly oiled bowl and turn to coat all sides with oil. Cover with plastic wrap and allow to rise in a warm space until doubled in size, about 1-2 hours.
Roll & bake
Once dough has risen, turn out onto a lightly floured surface and divide into 8 equal pieces. Roll each piece into a ball, stretching and tucking the edges underneath if necessary to create a ball shape. Cover with plastic wrap and let rise for 10-15 minutes until slightly puffed.
Heat your cast iron skillet over medium/high heat for at least 5 minutes (you should be able to feel the heat radiating from it if you hover your hand a few inches above it).
Once skillet is heated and dough has risen, working with one ball at a time, roll dough out into a 6-8” (15-20cm) circle.
Carefully place circle (just one or two at a time, depending on the space in your skillet) into your heated skillet and heat on one side for about 45-60 seconds, until bubbles start to form. Flip over and cook until naan is cooked through, this will usually take another 30-60 seconds.
Remove naan to a plate, and repeat until all naan is cooked. Prepare the topping
Garlic butter topping
In a small saucepan, melt butter over low heat.
4 Tablespoons salted butter
Add parsley and garlic (if making garlic naan) and stir to combine. Cook several minutes, until fragrant.
Use a pastry brush to brush topping over warm, cooked naan. Enjoy!
Notes
Instant yeast
To use instant yeast, substitute 1 ? teaspoons instant yeast and follow the recipe as written. Rise time will be the same or very similar as when using active yeast.
Flour
I prefer bread flour for a chewier naan, but all-purpose flour will work in a pinch.
Storing
Allow to cool completely and place in an airtight container or resealable ziploc bag. Refrigerate for 2-3 days or freeze (I wrap the naan individually in plastic wrap first if freezing) for 1-2 months.To reheat, warm in a 325F (160C) oven for several minutes, until warmed through.
A comforting
and hearty dish featuring tender cabbage, savory ground beef,
and gooey cheddar cheese.
Author: by Shawn; by Shawn
Recipe Type: American
Total Time: 45 minutes
Prep Time: 15 minutes Cook Time: 30 minutes
Ingredients:
1
medium?cabbage, chopped
1?lb
ground beef
1
medium?onion, chopped
2?cloves
garlic, minced
1?can
(14.5 oz) Diced?tomatoes?with juice
1?cup
cooked rice
1?teaspoon
Italian seasoning
Salt and?pepper, to taste
2?cups
Cheddar cheese, shredded
1?cup
beef broth
Directions:
Preheat
your oven to 375°F (190°C) to get started while you prep the
ingredients.
Chop the cabbage into bite-sized pieces and set aside.
In a large skillet over medium heat, cook the ground beef
until browned.
Add the chopped onion and minced garlic to the skillet. Sauté
until the onion is translucent and fragrant, about 3-5
minutes.
Stir in the diced tomatoes with juice, cooked rice, Italian
seasoning, salt, and pepper. Mix well to combine all flavors.
Add the chopped cabbage and beef broth to the skillet,
stirring gently. Let this mixture simmer for about 5 minutes
until the cabbage starts to soften but still has some texture.
Transfer the entire mixture to a greased casserole dish,
spreading it out evenly.
Sprinkle the shredded cheddar cheese evenly over the top.
Bake uncovered for 20-25 minutes, or until the cheese is
melted and slightly browned.
Remove from the oven and let it cool for a few minutes before
serving. Enjoy!
Notes:
Store leftovers in an airtight container in the refrigerator
for up to 3 days. Reheat covered in the oven at 350°F (175°C)
for 15-20 minutes.
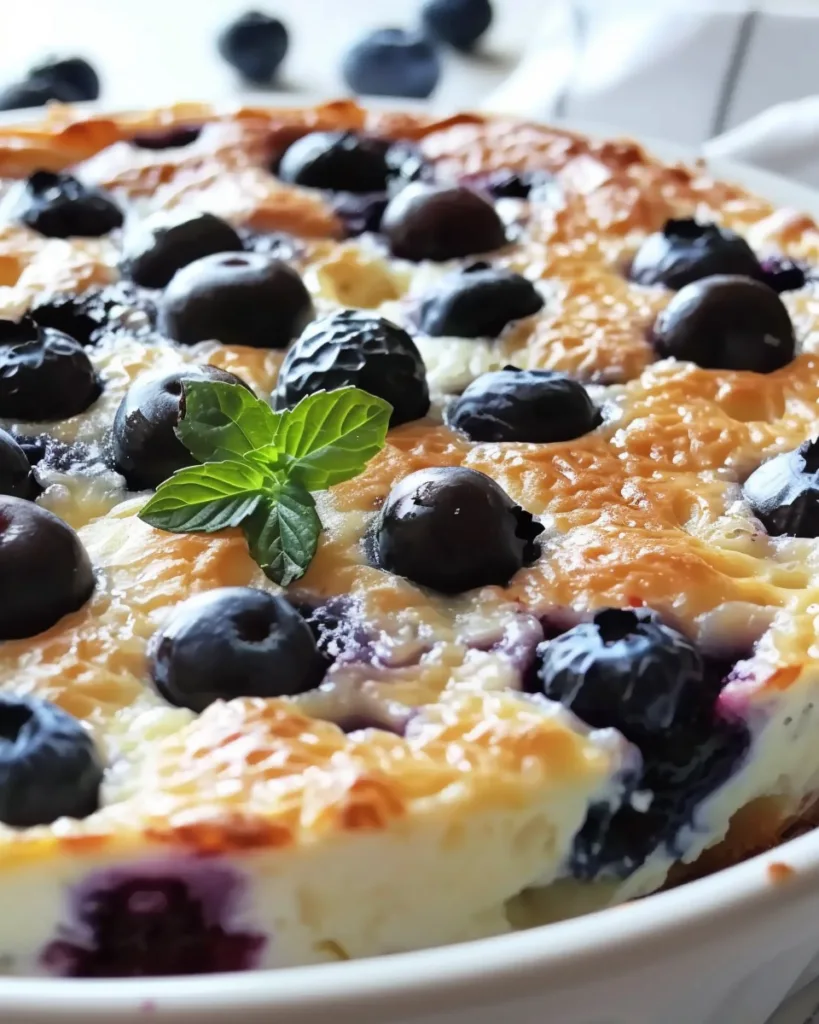
Juicy blueberries
and creamy cottage cheese come together in this tender
breakfast bake—high in protein, naturally sweet, and
oven-fresh delicious.
Why You’ll
Love This Recipe
High in protein and fiber?–
Keeps you full longer.
Naturally sweetened?–
Uses honey or maple syrup instead of refined sugar.
Quick and easy?–
Just mix and bake!
Perfect for meal prep?–
A great option for busy mornings.
Ingredients
1 cup cottage cheese
1 cup rolled oats
1 cup fresh blueberries
2 large eggs
1/4 cup honey or maple syrup
1 teaspoon cinnamon
1 teaspoon vanilla extract
1 teaspoon baking powder (optional)
Directions
Preheat your oven to 350°F (175°C). Grease an
8×8-inch baking dish or individual ramekins.
For a smooth texture, blend the cottage
cheese, oats, eggs, honey or maple syrup, vanilla extract,
and cinnamon in a blender or food processor until creamy.
For a chunkier texture, whisk all ingredients together in a
bowl without blending.
Gently fold in the fresh blueberries.
Pour the mixture into the prepared baking
dish.
Bake for 25–30 minutes, or until the top is
set and golden brown.
Let it cool for 5 minutes before serving.
Enjoy warm, as-is, or topped with yogurt, nuts, or extra
honey.
开云体育s and
Timing
Prep Time:?10
minutes
Cooking Time:?30
minutes
Total Time:?40
minutes
开云体育s:?4
servings
Calories per serving:?Approximately
200 kcal
Storage/Reheating
Refrigeration:?Store
in an airtight container in the refrigerator for up to 3
days.
Freezing:?Freeze
in portions and reheat as needed.
Reheating:?Warm
in the oven at 300°F (150°C) or microwave for 30 seconds.
FAQs
Can I use
frozen blueberries?
Yes! Add them directly to the mixture without thawing to
prevent excess moisture.
Can I make this dairy-free?
You can substitute cottage cheese with a dairy-free
alternative like almond, soy, or coconut yogurt.
What can I use instead of oats?
Try almond flour, coconut flour, or quinoa flakes for a
different texture and dietary preference.
Can I add nuts or seeds?
Absolutely! Chopped walnuts, almonds, or chia seeds add extra
crunch and nutrition.
Can I use a different sweetener?
Yes, swap honey for maple syrup, stevia, monk fruit sweetener,
or coconut sugar based on your preference.
Is this bake gluten-free?
Yes, as long as you use certified gluten-free oats or
substitute with almond or coconut flour.
How do I make it more filling?
Serve with Greek yogurt, nut butter, or a sprinkle of granola
for extra protein and texture.
Can I make it ahead of time?
Yes, bake it the night before and store it in the fridge.
Reheat for a quick breakfast.
Can I use a muffin tin instead?
Yes! Bake in a muffin tin at 350°F for 15-20 minutes for
convenient individual portions.
What can I serve this with?
Enjoy it with fresh fruit, yogurt, or a drizzle of extra honey
for added sweetness.
Can I freeze this bake?
Yes! Let it cool completely, then wrap individual portions
tightly in plastic wrap and store them in an airtight
container in the freezer for up to 3 months. Reheat in the
oven or microwave before serving.
How long does it last in the fridge?
Stored in an airtight container, this bake will stay fresh in
the fridge for up to 4 days.
Conclusion
The Blueberry Cottage Cheese Breakfast Bake
is a delicious and wholesome breakfast option that is easy to
prepare and packed with nutrients. Whether you enjoy it fresh
out of the oven or as a grab-and-go meal, this bake is sure to
keep you satisfied and energized throughout the day. Try it
today and start your morning on a healthy note!
Additional
Recipes to Try
If you enjoyed this?Blueberry
Cottage Cheese Breakfast Bake, here are some other
delicious and healthy recipes you might love:
Try these??for a
protein-packed, grab-and-go breakfast.
If you love blueberries, don’t miss this?—a moist and flavorful classic.
For a light and airy treat, check out this?, perfect
for a guilt-free snack.
Craving a rich and creamy dessert? Indulge in
this?, a luscious twist
on a classic.
Satisfy your sweet tooth with?, a delightful mix of
fruity and creamy flavors.
Enjoy experimenting with these recipes and
finding new favorites!