
Keyboard Shortcuts
ctrl + shift + ? :
Show all keyboard shortcuts
ctrl + g :
Navigate to a group
ctrl + shift + f :
Find
ctrl + / :
Quick actions
esc to dismiss
Likes
- DailyRecipes
- Messages
Search
|
Zucchini and Tomato Frittata
Zucchini and Tomato FrittataA frittata is an Italian version of an omelet. It’s wonderful for breakfast or an elegant brunch. One of our favorite versions is a frittata with zucchini and tomatoes. This zucchini and tomato frittata combines savory seasonings with fresh garden vegetables for a deli... 10m PREP TIME 15m COOK TIME 133 CALORIES 11 INGREDIENTS Servings: 6 Ingredients
6 eggs INSTRUCTIONS
NUTRITION INFORMATION (per Serving) Calories 133 Total Fat 9g Cholesterol 195mg Sodium 192mg Carbohydrates 4g Fiber 1g Protein 9g Source: McCormick ~~~~~ Rhonda in MO |
||||||||||||||||||||||||
|
Tomato Pie
Tomato PieTomato pie is a savory pie filled with fresh tomatoes and sprinkled with cheese. Try our delicious tomato pie recipe, featuring fresh tomatoes and melted gruyere and parmesan cheese in a flaky crust. Whether you're craving a pizza or want to try something new, this tomato pie recipe is sure to bring amazing flavors to your table!? 15m PREP TIME 1hr COOK TIME 12 INGREDIENTS Servings: 8 Ingredients
INSTRUCTIONS
Source: McCormick ~~~~~ Rhonda in MO |
||||||||||||||||||||||||
|
Chili Roasted Chickpeas
Chili Roasted ChickpeasCreate a delicious and nutritious treat with this roasted chickpea recipe. Crispy roasted chickpeas make a healthy alternative to chips and can also be used as a topping for salads, grain bowls and more. How do you roast chickpeas? It’s easy! Season chickpeas with?, drizzle with olive oil and pop them in the oven for about an hour. Store in an airtight container to keep your chili-roasted chickpeas good for a week. ?20m PREP TIME 1hr COOK TIME 145 CALORIES 3 INGREDIENTS Servings: 12 (1/4-cup) Ingredients
INSTRUCTIONS
NUTRITION INFORMATION (per Serving) Calories 145 Total Fat 5g Cholesterol 0mg Sodium 299mg Carbohydrates 19g Fiber 7g Protein 1g Source: McCormick ~~~~~ Rhonda in MO |
||||||||||||||||||||||||
|
Turmeric Chicken Tacos with Tomato Avocado Salsa
Turmeric Chicken Tacos with Tomato Avocado SalsaThis colorful grilled chicken and garden-fresh salsa recipe could be the foundation of a flavorful build-your-own taco bar, perfect for easy entertaining while incorporating the healthy benefits of curcumin in turmeric powder. 15m PREP TIME 16m COOK TIME 397 CALORIES 15 INGREDIENTS Servings: 8 Ingredients
INSTRUCTIONS
NUTRITION INFORMATION (per Serving) Calories 397 Total Fat 21g Cholesterol 74mg Sodium 882mg Carbohydrates 27g Fiber 4g Protein 25g Source: McCormick ~~~~~ Rhonda in MO |
||||||||||||||||||||||||
|
Mediterranean Fish Fillets
Mediterranean Fish FilletsThis healthy Mediterranean fish recipe brings the flavors of Greece to your home. Mediterranean fish is baked to perfection and then topped with a flavorful sauce made from tomatoes, olives, wine, basil, garlic and thyme. Serve your Mediterranean fish over a bed of rice for a healthy meal you can enjoy anytime.? 10m PREP TIME 20m COOK TIME 201 CALORIES 9 INGREDIENTS Servings: 6 Ingredients
INSTRUCTIONS
NUTRITION INFORMATION (per Serving) Calories 201 Total Fat 9g Cholesterol 37mg Sodium 477mg Carbohydrates 5g Fiber 1g Protein 25g Source: McCormick ~~~~~ Rhonda in MO |
||||||||||||||||||||||||
|
Shaker Lemon Pie (marketgrow.com)
Shaker lemon pie is a classic dessert that dates back to the Shaker communities of the 19th century. This pie is known for its simplicity and intense lemon
flavor, making it a perfect treat for lemon lovers. The unique aspect of this pie is that it uses the entire lemon, including the peel, which gives it a distinctive tartness balanced by the sweetness of the sugar. The result is a bright, zesty filling encased in a flaky, buttery crust. This pie is traditionally served with a dollop of whipped cream or a scoop of vanilla ice cream to mellow the sharp citrus notes. Pie INGREDIENTS:
list of 7 items ? 2 large lemons ? 2 cups granulated sugar ? 4 large eggs ? 1/4 teaspoon salt ? 2 tablespoons unsalted butter, melted ? 2 tablespoons all-purpose flour ? 1 double-crust pie pastry (store-bought or homemade) list end INSTRUCTIONS:
list of 5 items 1. Prepare the Lemons: Wash the lemons thoroughly. Slice them very thinly, removing any seeds. Place the lemon slices in a bowl and mix them with the sugar. Let the mixture sit for at least 4 hours or overnight. This process allows the lemons to macerate, softening the rinds and infusing the sugar with their flavor. 2. Prepare the Filling: In a separate bowl, whisk together the eggs, salt, melted butter, and flour until smooth. Stir in the macerated lemons and all the sugary juice. 3. Assemble the Pie: Preheat your oven to 425°F (220°C). Roll out half of the pie pastry and line a 9-inch pie dish with it. Pour the lemon filling into the crust. Roll out the second half of the pastry and place it over the top of the pie. Trim any excess dough and crimp the edges to seal. Cut a few small slits in the top crust to allow steam to escape. 4. Bake the Pie: Place the pie on the middle rack of the oven and bake for 20 minutes. Then, reduce the oven temperature to 350°F (175°C) and continue baking for an additional 25-30 minutes, or until the crust is golden brown and the filling is bubbling. 5. Cool and Serve: Allow the pie to cool completely before slicing. Serve with whipped cream or vanilla ice cream if desired. Pie list end Enjoy your Shaker Lemon Pie with its refreshing tartness and sweet, buttery crust—a perfect balance of flavors in every bite!
? |
||||||||||||||||||||||||
|
Southern Sausage Gravy (marketgrow.com)
Southern sausage gravy is a classic comfort food that’s rich, savory, and perfect for serving over warm, fluffy biscuits. This simple yet flavorful dish
is a staple in Southern kitchens, known for its creamy texture and the bold, peppery flavor of ground sausage. Made with just a handful of ingredients—sausage, flour, milk, and seasoning—this hearty gravy is a quick breakfast or brunch favorite that delivers big on taste. Whether you’re preparing it for a special family gathering or a cozy weekend breakfast, Southern Sausage Gravy is sure to satisfy. INGREDIENTS:
list of 6 items ? 1 lb breakfast sausage (mild or spicy) ? 1/4 cup all-purpose flour ? 2 cups whole milk (or more for desired consistency) ? Salt, to taste ? Freshly ground black pepper, to taste ? 1/2 teaspoon crushed red pepper flakes (optional, for added heat) list end INSTRUCTIONS:
list of 5 items 1. Brown the Sausage: In a large skillet over medium heat, crumble the sausage and cook until browned and fully cooked through, about 5-7 minutes. Break the sausage into smaller pieces as it cooks. Do not drain the fat. 2. Add the Flour: Sprinkle the flour over the cooked sausage and stir well to combine. Cook for 2-3 minutes, allowing the flour to absorb the fat and brown slightly, which will give the gravy a rich flavor. 3. Add the Milk: Gradually stir in the milk, stirring constantly to avoid lumps. Bring the mixture to a simmer, allowing it to thicken as it cooks. If the gravy becomes too thick, you can add a little more milk to reach your desired consistency. 4. Season: Taste and season the gravy with salt and plenty of freshly ground black pepper. For a spicier kick, add the crushed red pepper flakes. 5. Serve: Remove the gravy from heat once it reaches your preferred thickness. Serve hot over freshly baked biscuits or your favorite breakfast dish. list end Enjoy this Southern classic with a side of scrambled eggs or hash browns for a complete, satisfying meal!
?
|
||||||||||||||||||||||||
|
Taco Bell Burrito Supreme
开云体育Taco Bell Burrito Supreme
You can make Taco Bell Burrito Supreme at
home with this easy copycat recipe.
Be honest. You love Taco Bell, and you can’t get enough of the restaurant’s?Supreme Burrito. It’s understandable. After all, it is hard to resist a fresh flour tortilla loaded with beef, beans, cheese, and veggies. Now you can make beef and bean burritos just like Taco Bell at home with this copycat recipe! ?CourseMain Course
?CuisineMexican
?KeywordTaco Bell Burrito
Supreme
?Prep Time15minutes?minutes
?Cook Time30minutes?minutes
?Total Time45minutes?minutes
?Servings8
?Calories388kcal
?AuthorStephanie
Manley
IngredientsMexican Seasoned Beef Filling
Burrito
InstructionsMexican Seasoned Beef Filling
Burrito Refried Beans and Tortillas
Burrito Assembly
NutritionCalories:?388kcal?|?Carbohydrates:?23g?|?Protein:?21g?|?Fat:?23g?|?Saturated Fat:?10g?|?Polyunsaturated Fat:?1g?|?Monounsaturated Fat:?9g?|?Trans Fat:?1g?|?Cholesterol:?75mg?|?Sodium:?831mg?|?Potassium:?403mg?|?Fiber:?5g?|?Sugar:?3g?|?Vitamin A:?929IU?|?Vitamin C:?3mg?|?Calcium:?184mg?|?Iron:?3mg
Ginny Butterfield Cranberry Twp, Pa |
||||||||||||||||||||||||
|
Christmas Pinwheel Cookies (marketgrow.com)
Christmas pinwheel cookies are a festive and delightful treat that bring a swirl of holiday cheer to any cookie platter. With vibrant colors and a buttery,
sugar-cookie base, these pinwheels are as visually stunning as they are delicious. Perfect for baking with kids or as a thoughtful homemade gift, these cookies are flavored with vanilla and a hint of almond extract, adding a subtle sweetness to their charm. The dough is rolled and layered with holiday hues, creating a beautiful spiral effect that captures the spirit of the season. Serve these at holiday parties or leave them out for Santa! --------------------------------------------------------------------------------
Ingredients:
list of 10 items
? 2 ? cups all-purpose flour ? 1 teaspoon baking powder ? ? teaspoon salt ? 1 cup unsalted butter, softened ? 1 cup granulated sugar ? 1 large egg ? 2 teaspoons vanilla extract ? ? teaspoon almond extract ? Red and green gel food coloring ? Optional: Sprinkles for rolling list end -------------------------------------------------------------------------------- Instructions:
list of 6 items
1. Prepare the Dough: In a medium bowl, whisk together the flour, baking powder, and salt. In a large bowl, use a hand or stand mixer to cream together the softened butter and sugar until light and fluffy, about 2-3 minutes. Add the egg, vanilla extract, and almond extract, mixing until fully incorporated. Gradually add the dry ingredients to the wet ingredients, mixing until a smooth dough forms. 2. Divide and Color the Dough: Divide the dough into three equal portions. Leave one portion plain, then color the other two portions with red and green gel food coloring, kneading the dough until the colors are evenly distributed. 3. Roll Out the Layers: Roll out each dough portion separately between sheets of parchment paper to form three equally sized rectangles, approximately ? inch thick. Chill the rolled-out dough in the refrigerator for about 15 minutes. 4. Assemble the Pinwheels: Once chilled, remove the top parchment paper from each layer. Stack the red dough on top of the plain dough, then place the green dough on top of the red dough. Trim the edges to make a neat rectangle. Carefully roll the stacked dough into a tight log, starting from one of the long sides. Wrap the log in plastic wrap and chill for at least 1-2 hours, or until firm. 5. Cut and Bake: Preheat your oven to 350°F (175°C). Line baking sheets with parchment paper. Unwrap the chilled dough log and, using a sharp knife, slice it into ?-inch thick rounds. Roll the edges in sprinkles if desired. Place the cookies on the prepared baking sheets, spacing them about 2 inches apart. 6. Bake and Cool: Bake for 10-12 minutes, or until the edges are just set. The cookies should not brown. Let them cool on the baking sheets for 5 minutes before transferring to a wire rack to cool completely. list end -------------------------------------------------------------------------------- Notes:
list of 2 items
? For a more vibrant swirl, use gel food coloring rather than liquid. ? Store cookies in an airtight container at room temperature for up to 5 days, or freeze for longer storage. list end Enjoy these colorful Christmas Pinwheel Cookies and make your holiday season even more magical!
?
|
||||||||||||||||||||||||
|
Barbecued Baby Back Ribs (marketgrow.com)
Barbecued baby back ribs are a quintessential dish for any summer cookout or special occasion. These tender, juicy ribs are coated in a smoky, sweet, and
tangy barbecue sauce that caramelizes beautifully as they slow-cook on the grill or in the oven. The key to perfect baby back ribs lies in low and slow cooking, which allows the meat to become incredibly tender while absorbing the rich flavors of the seasoning and sauce. Whether you’re a seasoned grill master or new to making ribs, this recipe is sure to impress your guests and satisfy your taste buds. Paired with your favorite sides, Barbecued Baby Back Ribs are the ultimate comfort food, offering a mouthwatering combination of smoky, sweet, and savory flavors. INGREDIENTS:
FOR THE RIBS: list of 10 items ? 2 racks of baby back ribs (about 4 pounds) ? 2 tablespoons olive oil ? Salt and black pepper, to taste ? 1 tablespoon paprika ? 1 tablespoon brown sugar ? 1 teaspoon garlic powder ? 1 teaspoon onion powder ? 1/2 teaspoon ground cumin ? 1/2 teaspoon chili powder ? 1/4 teaspoon cayenne pepper (optional for heat) list end FOR THE BARBECUE SAUCE:
list of 10 items ? 1 1/2 cups ketchup ? 1/4 cup apple cider vinegar ? 2 tablespoons brown sugar ? 2 tablespoons honey ? 1 tablespoon Worcestershire sauce ? 1 tablespoon Dijon mustard ? 1 teaspoon smoked paprika ? 1/2 teaspoon garlic powder ? 1/2 teaspoon onion powder ? Salt and pepper, to taste Worcestershire sauce list end INSTRUCTIONS:
PREPARE THE RIBS: list of 2 items 1. Remove the Membrane: Start by removing the silver skin (membrane) from the back of the ribs. This can be done by gently sliding a knife under the membrane and pulling it off. This will help the ribs cook more evenly and allow the seasoning to penetrate better. 2. Season the Ribs: Rub the ribs with olive oil to help the seasoning stick. Then, combine salt, black pepper, paprika, brown sugar, garlic powder, onion powder, cumin, chili powder, and cayenne pepper in a small bowl. Generously season both sides of the ribs with the spice mixture, pressing it into the meat. list end MAKE THE BARBECUE SAUCE:
list of 1 items 3. Prepare the Sauce: In a medium saucepan, combine the ketchup, apple cider vinegar, brown sugar, honey, Worcestershire sauce, Dijon mustard, smoked paprika, garlic powder, onion powder, salt, and pepper. Bring to a simmer over medium heat, stirring occasionally. Let the sauce cook for about 15-20 minutes, or until it thickens slightly. Taste and adjust seasoning if necessary, adding more sweetness, salt, or vinegar to balance the flavor. Worcestershire sauce list end COOKING THE RIBS:
list of 1 items 4. Grilling Method (preferred): Preheat your grill to medium-low heat (about 275°F). Place the ribs on the grill over indirect heat (not directly above the flame) and close the lid. Grill the ribs for about 2 1/2 to 3 hours, flipping every 30 minutes and basting with the barbecue sauce during the last 30 minutes of cooking. The ribs should be tender, and the meat should pull away from the bone easily.Oven Method (alternative): Preheat your oven to 300°F. Place the ribs on a baking sheet lined with foil, and cover them with another piece of foil to trap moisture. Bake for 2 1/2 to 3 hours, then remove the top layer of foil and brush the ribs with barbecue sauce. Bake for an additional 15-20 minutes to allow the sauce to set and become sticky. list end SERVE:
list of 1 items 5. Rest and Slice: Once the ribs are cooked and tender, remove them from the grill or oven and let them rest for about 10 minutes before slicing into individual ribs. Serve with extra barbecue sauce on the side and your favorite sides, like coleslaw, corn on the cob, or baked beans. list end ? |
||||||||||||||||||||||||
|
Cinnamon Donut Bread Recipe
开云体育Cinnamon Donut Bread Recipe?
 Cinnamon Donut Bread Recipe: A Sweet & Cozy TreatIf you love the taste of?warm cinnamon donuts?but want the simplicity of a quick bread, this?Cinnamon Donut Bread?is the perfect recipe for you! It’s packed with rich cinnamon flavor, a soft and fluffy texture, and a sugary coating that mimics the classic?bakery-style donuts?we all love. Whether you’re making it for a cozy breakfast, a sweet afternoon snack, or a delightful dessert, this homemade treat will bring warmth and joy to every bite. IntroductionThere’s something truly special about the?aroma of cinnamon baking in the oven. It fills the kitchen with warmth, nostalgia, and pure comfort. This?Cinnamon Donut Bread?combines the?tender crumb of a homemade quick bread?with the?sweet, spiced flavor of a classic donut, making it an irresistible treat for any occasion. The best part? It’s?easy to make with simple pantry ingredients, requires no yeast, and can be enjoyed on its own or topped with a delicious cinnamon-sugar coating. Plus, it pairs perfectly with a hot cup of coffee, tea, or a glass of milk. Let’s get started on this?soft, moist, and flavorful?bread that will make every morning feel special! IngredientsTo make this?deliciously spiced Cinnamon Donut Bread, gather the following ingredients: Essential Ingredients for the Bread
For the Cinnamon-Sugar Topping (Optional but Highly Recommended!)
How to Make Cinnamon Donut Bread1. Preheat the Oven & Prepare the PanPreheat your oven to?350°F (175°C). Grease a?9×5-inch loaf pan?with butter or non-stick spray, and line it with parchment paper for easy removal. 2. Mix the Dry IngredientsIn a large mixing bowl, whisk together the?all-purpose flour, granulated sugar, baking powder, baking soda, cinnamon, and salt. This ensures an even distribution of the ingredients and helps create a perfectly spiced bread. 3. Combine the Wet IngredientsIn another bowl, whisk together the?buttermilk, melted butter, eggs, and vanilla extract?until smooth and well combined. The buttermilk helps create a tender crumb, while the eggs and butter add richness to the bread. 4. Mix the BatterGradually add the?wet ingredients?to the?dry ingredients, stirring gently until just combined. Avoid overmixing, as this can make the bread dense instead of light and fluffy. The batter should be smooth but slightly thick. 5. Pour & BakePour the batter into the prepared loaf pan and?smooth the top with a spatula. Bake for?45-50 minutes, or until a toothpick inserted into the center comes out clean. The bread should have a golden brown color and a slightly crisp top. 6. Prepare the Cinnamon-Sugar ToppingWhile the bread is baking, mix together?? cup granulated sugar and 1 teaspoon cinnamon?in a small bowl. In another bowl, melt?2 tablespoons of butter. 7. Add the Cinnamon-Sugar CoatingOnce the bread is baked, remove it from the oven and let it cool for?10 minutes?in the pan. Brush the top with melted butter and sprinkle generously with the cinnamon-sugar mixture. This gives the bread that signature?donut-like flavor and texture. 8. Serve & Enjoy!Let the bread cool completely before slicing. Serve warm or at room temperature with?a cup of coffee, tea, or a drizzle of honey for extra sweetness. Helpful Tips for the Best Cinnamon Donut Bread
Cooking TipsTake your?Cinnamon Donut Bread?to the next level with these creative additions:
Serving SuggestionsThis?warm, sweet, and comforting?bread pairs beautifully with:
Nutritional InformationHere’s a breakdown of the nutritional content per serving:
Storage & Leftovers
Frequently Asked Questions (FAQs)Can I make
this bread gluten-free? Can I use a
different type of sugar? What if I
don’t have buttermilk? Can I turn
this into muffins? Related Recipes You’ll LoveIf you enjoyed this?Cinnamon Donut Bread, check out these other?delicious baked goods: ConclusionThis?Cinnamon
Donut Bread?is an absolute must-try
for?cinnamon lovers and donut fans alike.
With its?soft texture, warm spices, and sweet
sugar topping, it’s the perfect cozy treat for any
time of day. Try this?easy homemade recipe?today
and enjoy a slice of?sweet, cinnamon goodness!? Ginny Butterfield Cranberry Twp, Pa |
||||||||||||||||||||||||
|
Mediterranean Ground Beef Stir Fry Recipe
开云体育Mediterranean Ground Beef Stir Fry Recipe? 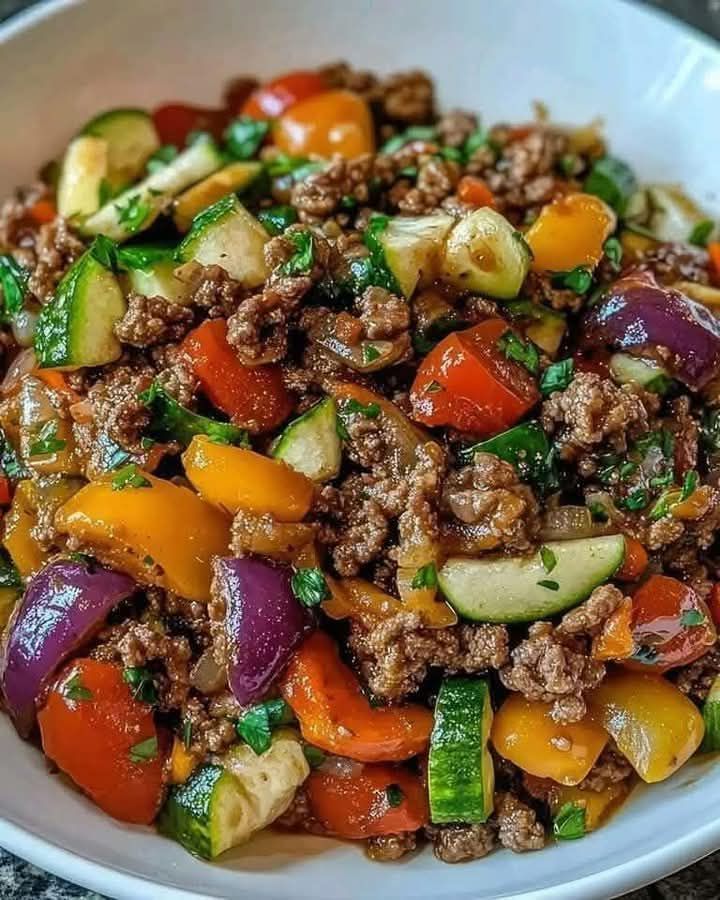 Craving a quick, easy, and flavorful meal that’s packed with protein and vibrant Mediterranean flavors? This Mediterranean Ground Beef Stir Fry is the perfect dish for busy weeknights, meal prepping, or whenever you want a nutritious yet satisfying meal. With juicy ground beef, fresh vegetables, and aromatic spices, this stir fry comes together in just 30 minutes and is perfect for serving over rice, quinoa, or even in lettuce wraps. Introduction Mediterranean cuisine is known for its bold flavors, fresh ingredients, and healthy balance of proteins, vegetables, and herbs. This Mediterranean Ground Beef Stir Fry takes all those delicious elements and transforms them into a quick and easy one-pan dish. The savory ground beef is cooked with red onions, zucchini, and garlic, then seasoned with classic Mediterranean spices like cumin, paprika, and oregano. What makes this stir fry extra special is its versatility—it pairs beautifully with rice, couscous, or even roasted vegetables. Plus, it’s low in carbs, making it a great option for those following a keto or paleo diet. Whether you’re preparing a healthy family dinner or looking for a protein-packed meal prep recipe, this dish is guaranteed to be a hit! Ingredients To prepare this delicious Mediterranean Ground Beef Stir Fry, gather the following ingredients: 1 lb ground beef 1 tbsp olive oil 1 small red onion, sliced 2 cloves garlic, minced 1 zucchini, sliced Additional Vegetables & Seasonings 1/2 red bell pepper, sliced 1/2 yellow bell pepper, sliced 1 tsp ground cumin 1 tsp smoked paprika 1/2 tsp dried oregano 1/2 tsp salt 1/4 tsp black pepper 1/2 cup cherry tomatoes, halved 1/4 cup Kalamata olives, sliced 2 tbsp crumbled feta cheese (optional) 2 tbsp fresh parsley, chopped 1 tbsp lemon juice How to Make Mediterranean Ground Beef Stir Fry 1. Heat the Pan Start by heating 1 tablespoon of olive oil in a large skillet or pan over medium-high heat. Once the oil is hot, add the sliced red onion and sauté for 2-3 minutes until softened and fragrant. 2. Cook the Ground Beef Add the ground beef to the skillet, breaking it apart with a spatula. Cook for about 5-7 minutes, stirring occasionally, until the beef is browned and fully cooked. Drain excess fat if necessary. 3. Add the Garlic & Vegetables Stir in the minced garlic, sliced zucchini, and bell peppers. Cook for another 3-4 minutes, allowing the vegetables to soften while still retaining some crunch. 4. Season the Stir Fry Sprinkle in the ground cumin, smoked paprika, oregano, salt, and black pepper. Stir well to coat the beef and vegetables evenly with the aromatic spices. 5. Add the Tomatoes & Olives Gently mix in the halved cherry tomatoes and sliced Kalamata olives. Cook for another 2 minutes, allowing the flavors to meld together. 6. Finish with Lemon & Herbs Remove the stir fry from heat and drizzle with fresh lemon juice. Garnish with chopped parsley and crumbled feta cheese for an added burst of Mediterranean flavor. 7. Serve & Enjoy! Serve the Mediterranean Ground Beef Stir Fry hot over steamed rice, quinoa, couscous, or cauliflower rice for a complete meal. You can also enjoy it inside a warm pita or lettuce wraps for a low-carb option. Helpful Tips Use Lean Ground Beef: Opt for 90% lean ground beef to reduce excess grease while still maintaining juiciness. Don’t Overcook the Vegetables: Keep the zucchini and bell peppers slightly crisp for the best texture. Enhance the Flavor: A sprinkle of red pepper flakes adds a bit of heat, while a drizzle of tahini sauce makes it extra creamy. Meal Prep Friendly: This dish stores well in the fridge and can be reheated easily for quick lunches or dinners. Cooking Tips To make your Mediterranean Ground Beef Stir Fry even better, try these pro tips: Customize the Protein: Swap ground beef for ground lamb, turkey, or chicken for a different flavor profile. Add More Veggies: Try adding spinach, mushrooms, or artichokes for an extra boost of nutrients. Try Different Cheeses: If you’re not a fan of feta, substitute with goat cheese or Parmesan. Serve with a Sauce: A drizzle of tzatziki or hummus on top enhances the Mediterranean flavors. Serving Suggestions This flavorful and healthy stir fry pairs perfectly with a variety of side dishes: Over Grains: Serve it over couscous, rice, quinoa, or bulgur for a hearty meal. With Pita Bread: Scoop it into warm pita pockets for an easy Mediterranean wrap. On a Salad: Enjoy it over mixed greens for a low-carb meal. With Roasted Vegetables: Serve alongside roasted eggplant, zucchini, or asparagus. Nutritional Information Here’s the estimated nutritional breakdown per serving: Calories: 350 Carbohydrates: 12g Protein: 28g Fat: 22g Saturated Fat: 7g Fiber: 4g Sugar: 5g Sodium: 580mg Vitamin C: 45% Calcium: 10% Iron: 15% Storage & Leftovers Refrigerate: Store leftovers in an airtight container in the fridge for up to 4 days. Freeze: Freeze in portion-sized containers for up to 2 months. Reheat: Warm in a skillet over medium heat, adding a splash of olive oil if needed. Frequently Asked Questions (FAQs) Can I use ground lamb instead of beef? Yes! Ground lamb adds an authentic Mediterranean flavor that pairs beautifully with the spices. What can I substitute for zucchini? You can use eggplant, mushrooms, or asparagus instead of zucchini. Is this recipe keto-friendly? Yes! If served without rice or grains, this stir fry is naturally low-carb and keto-friendly. Can I make this dairy-free? Absolutely! Simply omit the feta cheese or replace it with a dairy-free alternative. Conclusion This Mediterranean Ground Beef Stir Fry is the ultimate healthy, protein-packed, and flavorful dish that you can whip up in no time. With savory beef, fresh vegetables, and aromatic spices, it’s a versatile meal that can be enjoyed in countless ways. Try this easy one-pan recipe today and savor the delicious flavors of the Mediterranean!? Related Recipes You’ll LoveHere are some more?delicious Mediterranean-inspired recipes?to try: Ginny Butterfield Cranberry Twp, Pa |
||||||||||||||||||||||||
|
Roast Beef Wraps (marketgrow.com)
These roast beef wraps are a satisfying and easy-to-make meal, perfect for lunch or light dinner. With tender slices of roast beef, crisp vegetables, creamy horseradish sauce and peppery arugula, each bite is packed with flavor and texture. These wraps are quick to prepare and customizable - ideal for busy days when you want something tasty and filling without much fuss. Serve them with a side of chips or fresh green salad for a complete meal that’s both wholesome and delicious.
?
INGREDIENTS:
list of 8 items ? 4 large flour tortillas or wraps ? 1/2 lb (225g) thinly sliced roast beef ? 1/2 cup horseradish sauce or cream cheese spread ? 1 cup fresh arugula or spinach leaves ? 1/2 red bell pepper, thinly sliced ? 1/2 cucumber, thinly sliced ? 1/4 red onion, thinly sliced ? Salt and black pepper, to taste list end INSTRUCTIONS:
list of 7 items 1. Lay out the tortillas on a clean surface. 2. Spread a generous layer of horseradish sauce or cream cheese over each tortilla. 3. Divide the roast beef evenly among the tortillas, layering it down the center of each wrap. 4. Add arugula, bell pepper, cucumber, and red onion on top of the roast beef. 5. Sprinkle with salt and black pepper to taste. 6. Roll up each tortilla tightly around the fillings. Secure with a toothpick if needed. 7. Slice each wrap in half, if desired, and serve immediately or wrap in foil or plastic wrap to enjoy later. list end ?
|
||||||||||||||||||||||||
|
Easy Peanut Butter Pie (marketgrow.com)
For a no-bake dessert that’s both indulgent and incredibly simple to make, look no further than Easy Peanut Butter Pie. This creamy, rich pie combines
the irresistible flavors of peanut butter and cream cheese with a buttery graham cracker crust. It’s the perfect treat for peanut butter lovers, offering a smooth, velvety texture with just the right amount of sweetness. Ideal for a quick dessert option or for impressing guests with minimal effort, this pie is sure to become a favorite in your dessert rotation. INGREDIENTS:
list of 9 items ? 1 1/2 cups graham cracker crumbs ? 1/4 cup granulated sugar ? 1/2 cup melted butter ? 8 oz cream cheese, softened ? 1 cup creamy peanut butter ? 1 cup powdered sugar ? 1 cup heavy whipping cream ? 1 tsp vanilla extract ? Whipped cream and chopped peanuts for garnish (optional) list end INSTRUCTIONS:
list of 9 items 1. In a medium bowl, combine graham cracker crumbs, granulated sugar, and melted butter. Mix until the crumbs are evenly coated. 2. Press the mixture into the bottom and up the sides of a 9-inch pie dish to form the crust. Refrigerate while you prepare the filling. 3. In a large bowl, beat the softened cream cheese and peanut butter together until smooth and creamy. 4. Gradually add the powdered sugar, beating until well incorporated. 5. In a separate bowl, whip the heavy cream with vanilla extract until stiff peaks form. 6. Gently fold the whipped cream into the peanut butter mixture until fully combined. 7. Spoon the filling into the prepared crust and smooth the top with a spatula. 8. Refrigerate the pie for at least 2 hours, or until firm. 9. Before serving, garnish with whipped cream and chopped peanuts if desired. list end This Easy Peanut Butter Pie is a luscious and delightful treat that combines creamy, nutty flavors with a simple, no-fuss preparation. Enjoy the sweet
and savory goodness in every bite! ?
|
||||||||||||||||||||||||
|
Hashbrown-sausage Bake (marketgrow.com)
Hash Brown Sausage Bake is a comforting and hearty dish that’s perfect for breakfast, brunch, or even a cozy dinner. This bake combines crispy hash browns
with savory sausage, eggs, and a generous layer of melted? ?cheese, creating a dish that’s rich in flavor and satisfying in every bite. The golden hash browns form a crispy base, while the sausage adds a delicious, meaty depth. Topped with a creamy mixture of eggs and cheese, this? ?casserole ?is baked to perfection, making it an ideal dish to share with family and friends. It’s easy to prepare and can be made ahead, making it a convenient option for busy mornings or special occasions. INGREDIENTS:
list of 11 items ? 1 pound breakfast sausage (mild or spicy, depending on preference) ? 1 medium onion, finely chopped ? 1 red bell pepper, diced ? 3 cups frozen hash browns, thawed ? 6 large eggs ? 1 cup milk ? 1 teaspoon garlic powder ? 1/2 teaspoon smoked paprika ? Salt and pepper to taste ? 2 cups shredded cheddar cheese ? 1/4 cup chopped fresh parsley for garnish (optional) list end INSTRUCTIONS:
list of 7 items 1. Preheat the Oven: list of 1 items nesting level 1 ? Preheat your oven to 350°F (175°C). Grease a 9×13-inch baking dish and set aside. list end nesting level 1 2. Cook the Sausage: list of 2 items nesting level 1 ? In a large skillet, cook the breakfast sausage over medium heat, breaking it up with a spatula, until browned and cooked through. ? Add the chopped onion and diced red bell pepper to the skillet, cooking for another 5 minutes until the vegetables are softened. Drain any excess fat from the skillet. list end nesting level 1 3. Assemble the Bake: list of 2 items nesting level 1 ? Spread the thawed hash browns evenly across the bottom of the prepared baking dish. ? Layer the cooked sausage mixture over the hash browns. list end nesting level 1 4. Prepare the Egg Mixture: list of 2 items nesting level 1 ? In a large bowl, whisk together the eggs, milk, garlic powder, smoked paprika, salt, and pepper until well combined. ? Pour the egg mixture evenly over the sausage and hash browns in the baking dish. list end nesting level 1 5. Add the Cheese: list of 1 items nesting level 1 ? Sprinkle the shredded cheddar cheese evenly over the top of the casserole. list end nesting level 1 6. Bake: list of 1 items nesting level 1 ? Place the baking dish in the preheated oven and bake for 35-40 minutes, or until the eggs are set and the top is golden and bubbly. list end nesting level 1 7. Serve: list of 2 items nesting level 1 ? Remove the bake from the oven and let it cool slightly before serving. ? Garnish with chopped fresh parsley if desired. list end nesting level 1 list end This Hash Brown Sausage Bake is perfect for serving a crowd, whether for a holiday breakfast or a weekend brunch. Pair it with fresh fruit or a simple
salad for a complete and satisfying meal that everyone will love! ?
|
||||||||||||||||||||||||
|
Mediterranean Lemon Chicken with Artichokes and Olives
开云体育Mediterranean Lemon Chicken with Artichokes and Olives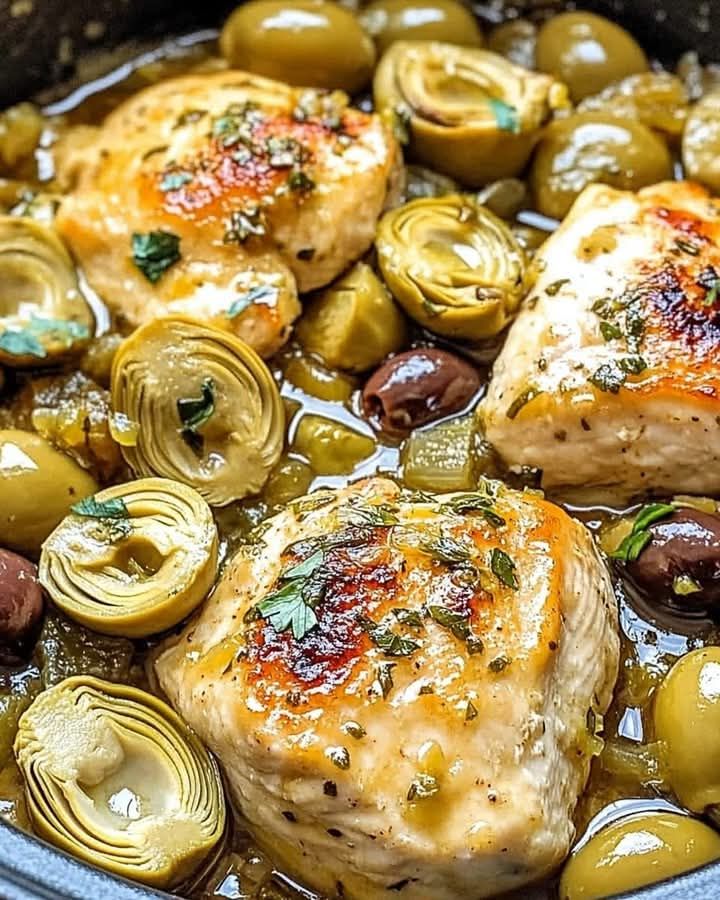 Mediterranean Lemon Chicken with Artichokes & Olives: A Flavorful One-Pan MealIf you’re looking for a dish that’s?fresh, vibrant, and packed with Mediterranean flavors, this?Mediterranean Lemon Chicken with Artichokes & Olives?is the perfect recipe. Juicy, tender chicken breasts are infused with?zesty lemon, aromatic oregano, and savory garlic, then simmered in a delicious broth with?briny Kalamata olives, tangy artichoke hearts, and fresh parsley. Every bite bursts with?bright, bold flavors, making this dish a fantastic option for a?healthy weeknight dinner, meal prep, or even an elegant dinner party. This dish is inspired by the?flavors of Greece and the Mediterranean region, known for its?simple yet deeply flavorful ingredients. The combination of?citrus, herbs, olives, and artichokes?creates a light yet satisfying meal that’s?low-carb, protein-packed, and naturally gluten-free. The best part? It all comes together in?one pan in under 30 minutes, making it a go-to recipe for busy days. Whether you’re following a?Mediterranean diet, looking for a healthy meal, or simply craving a delicious and easy chicken recipe, this dish is perfect. Pair it with?couscous, quinoa, or a fresh salad, and you’ll have a restaurant-quality meal right at home. Why You’ll Love This Recipe
IngredientsFor the Chicken:
For the Mediterranean Sauce:
How to Make Mediterranean Lemon Chicken with Artichokes & Olives
|
||||||||||||||||||||||||
|
Drumsticks with Parmesan-garlic Sauce (marketgrow.com)
These drumsticks with Parmesan garlic sauce are a perfect blend of savory and creamy flavors, ideal for a weeknight dinner or a special gathering. The drumsticks are baked until golden
and crispy, then tossed in a rich, garlicky Parmesan sauce that adds a delectable touch to each bite. The sauce, made with freshly grated Parmesan cheese, garlic, and a hint of herbs, clings to the chicken, providing a burst of flavor that complements the tender meat. Serve these drumsticks with a side of your choice, such as roasted vegetables or a fresh salad, to complete the meal. Sauce Parmesan cheese INGREDIENTS:
list of 6 items ? 8 chicken drumsticks ? 2 tablespoons olive oil ? Salt and pepper, to taste ? 1 teaspoon garlic powder ? 1 teaspoon onion powder ? 1 teaspoon dried Italian herbs (such as basil, oregano, and thyme) list end FOR THE PARMESAN GARLIC SAUCE:
list of 6 items ? 4 tablespoons butter ? 4 cloves garlic, minced ? 1 cup heavy cream ? 1 cup freshly grated Parmesan cheese ? Salt and pepper, to taste ? 1 tablespoon fresh parsley, chopped (optional) list end INSTRUCTIONS:
list of 7 items 1. Preheat the Oven: Preheat your oven to 400°F (200°C). Line a baking sheet with aluminum foil or parchment paper for easy cleanup. 2. Prepare the Drumsticks: Pat the chicken drumsticks dry with paper towels. In a large bowl, toss the drumsticks with olive oil, salt, pepper, garlic powder, onion powder, and dried Italian herbs until evenly coated. 3. Bake the Drumsticks: Arrange the drumsticks on the prepared baking sheet in a single layer. Bake in the preheated oven for 35-40 minutes, or until the drumsticks are cooked through and the skin is crispy and golden brown. 4. Make the Parmesan Garlic Sauce: While the drumsticks are baking, melt the butter in a saucepan over medium heat. Add the minced garlic and sauté until fragrant, about 1 minute. Stir in the heavy cream and bring to a simmer. 5. Add the Parmesan Cheese: Reduce the heat to low and gradually add the grated Parmesan cheese, stirring constantly until the cheese is melted and the sauce is smooth. Season with salt and pepper to taste. 6. Toss the Drumsticks: Once the drumsticks are done, transfer them to a large bowl. Pour the Parmesan garlic sauce over the drumsticks and toss until they are well coated. 7. Serve: Transfer the drumsticks to a serving platter and sprinkle with chopped parsley, if desired. Serve immediately and enjoy! list end These flavorful drumsticks are sure to be a hit at any dinner table, offering a delightful combination of crispy texture and creamy, cheesy goodness.
?
|
||||||||||||||||||||||||
|
German Apple Pancake (marketgrow.com)
German Apple Pancake, also known as a Dutch baby, is a puffed, oven-baked pancake that’s both light and fluffy, yet rich with the comforting flavors of
caramelized apples and cinnamon. The batter, similar to a popover, rises dramatically in the oven, creating a golden, crispy exterior with a soft, custard-like center. The sweet-tart apples and buttery cinnamon coating elevate this dish into a special breakfast or brunch treat. Simple to prepare and impressive to serve, this German apple pancake is a delightful way to start the day. INGREDIENTS:
list of 10 items ? 2 large apples (Granny Smith or Honeycrisp), peeled, cored, and sliced ? 3 tbsp unsalted butter ? 3 tbsp granulated sugar ? 1 tsp ground cinnamon ? 3 large eggs ? ? cup all-purpose flour ? ? cup milk ? 1 tsp vanilla extract ? ? tsp salt ? Powdered sugar (for garnish) list end INSTRUCTIONS:
list of 6 items 1. Preheat your oven to 425°F (220°C). 2. In a 10-12 inch oven-safe skillet, melt the butter over medium heat. Add the apple slices, sugar, and cinnamon, cooking for 5-7 minutes, until the apples are softened and lightly caramelized. Remove from heat and set aside. 3. In a blender or a bowl, whisk together the eggs, flour, milk, vanilla, and salt until smooth. 4. Pour the batter over the apples in the skillet. 5. Transfer the skillet to the preheated oven and bake for 15-18 minutes, or until the pancake is puffed and golden brown. 6. Remove the skillet from the oven and let the pancake deflate slightly. Dust with powdered sugar before serving. list end Serve your German apple pancake warm and enjoy its crispy edges and tender, apple-filled center!
? |
||||||||||||||||||||||||
|
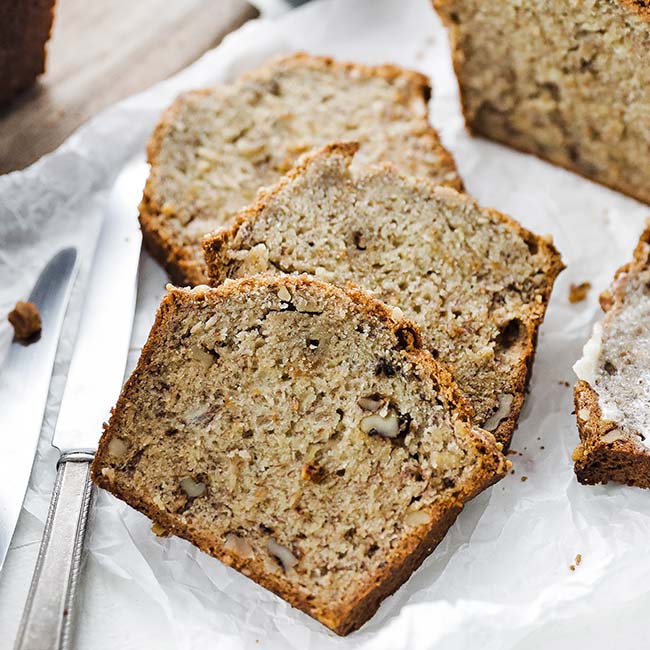
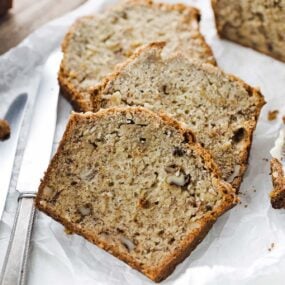
Homemade Banana Bread
开云体育 Homemade Banana Bread Recipe
|
||||||||||||||||||||||||
|
Banana Gratin from Heart & Soul in the Kitchen by Jacques Pépin
开云体育Banana Gratin from Heart &
Soul in the Kitchen ? by Jacques Pépin
?
?
? Banana Gratin
SERVES 4
IN JUST A FEW MINUTES, BANANAS CAN BE TRANSFORMED into a delicious dessert gratin. I like to serve this dish with old-style whole-milk yogurt that has a layer of cream on top. I bake the gratins in individual gratin dishes, but you can use any small ovenproof dishes you have. 2 ripe bananas (6 to 7 ounces each) 2 tablespoons pure maple syrup 2 tablespoons dried cranberries?? 2 tablespoons unsalted butter, melted 2 slices white bread (about 2 ounces), cut into ?-inch pieces 1 cup plain whole-milk yogurt or sour cream Preheat the oven to 400 degrees. Peel the bananas and slice them into a bowl. Combine with the rest of the ingredients except the yogurt. Divide among four small gratin dishes, about 4 inches across and 1 inch deep. Bake the gratins for 15 minutes. Serve warm or at room temperature, topped with the yogurt or sour cream. ? Notes from Ginny - Consider using honey in place of or in addition to? maple syrup. Consuder trying with other fruit such as apple or blueberries, etc. Consder using raisins in place of dried cranberries.? On Tv show Jacques Pepin also suggests dried cherries. This recipe was not eassy to find online.? I actually grabbed it from the epub version of the book using? copy and paste from the epub reader. The bananas gratin recipe is featured in this episode of Jacque's TV series: Youtube episode video: La Cocina Olé Mexican-themed Menu | Jacques Pépin: Heart & Soul | Lifestyle Food & Travel? From Wikipedia, the
free encyclopedia
Jacques Pépin?(French pronunciation:?; born December 18, 1935)?is a French chef, author, culinary educator, television personality, and artist.?After having been the personal chef of??, he moved to the US in 1959 and after working in New York's top French restaurants, refused the same job with President??in the??and instead took a culinary development job with?. During his career, he has served in numerous prestigious restaurants, first, in Paris, and then in America. He has appeared on American television and has written for?,??and other publications. He has authored more than 30 cookbooks, some of which have become best sellers. Pépin was a longtime friend of the American chef?, and their 1999??series?Julia and Jacques Cooking at Home?won a?. He also holds a BA and a MA from??in?. He has been honored with 24?,?five honorary doctoral degrees, the??lifetime achievement award, the Emmy Award for Lifetime Achievement in 2019?and the?, France's highest order of merit, in 2004. Since 1989, Pépin has taught in the Culinary Arts Program at??and served as dean of special programs at the??in New York City.?In 2016, with his daughter, Claudine Pépin and his son-in-law, Rollie Wesen, Pépin created the??to support culinary education for adults with barriers to employment.?He has lived in Connecticut since 1975.
Ginny Butterfield Cranberry Twp, Pa |
||||||||||||||||||||||||


to navigate to use esc to dismiss