Beans Mixed Calico Salad w/ Dressing
Beans Mixed Calico Salad w/ Dressing

 Recipe By     :
 开云体育 Size  : 1    Preparation Time :0:00
 Categories    : Salads

   Amount  Measure       Ingredient -- Preparation Method
 --------  ------------  --------------------------------
      1/2   c            Sugar
      1/2   ea           Green pepper, chopped
      1/2   c            Salad oil
    1       ea           Med. onion, chopped or rings
      1/2   c            Vinegar
    1       cn           Cut green beans
    1       t            Salt
    1       cn           Red kidney beans
      1/2   t            Pepper
    1       cn           Yellow wax beans

   Wash and drain kidney, green, and wax beans. Add chopped pepper and
   onion. Mix sugar, oil, vinegar, salt and pepper. Pour over salad.
   Chill. Mrs. John P. Elberti
Source: Recipe Source
|
Fried Vegetarian Spring Rolls (Cha Gio Chay)
Fried Vegetarian Spring Rolls (Cha Gio Chay)

 Recipe By     :
 开云体育 Size  : 1    Preparation Time :0:00
 Categories    : Appetizers                       Vegetarian
                 Ceideburg 2

   Amount  Measure       Ingredient -- Preparation Method
 --------  ------------  --------------------------------
                         -----ACCOMPANIMENTS-----
                         Vegetable Platter
    1      Thin          rice vermicelli (bun) -- (8 ounces) OR:
    2                    bn            Japanese alimentary paste -- noodles
 (somen).
    soaking
  liquid.  Mince all of the mushrooms.

  Combine all of the filling ingredients in a large mixing bowl; blend well
  with your hands.  Set aside.

  Assemble the rolls:  Fill a large bowl with 4 cups of warm water and
  dissolve the sugar in it.

  Rice paper is quite fragile.  Work with only 4 sheets at a time, keeping
  the remaining sheets covered with a barely damp cloth to prevent curling.

  Immerse the rice paper, one sheet at a time, into the sweetened warm water.=
  Quickly withdraw it and lay it flat on a dry towel.  Do this with 4 sheets
  without letting them touch each other.  The rice paper will become pliable
  within seconds.

  Fold over the bottom third of each round.  Put 1 generous teaspoon of
  filling in the center of the folded-over portion.  Press it into a compact
  rectangle.  Fold one side of the paper over the mixture, then the other
  side.  Roll from the bottom to the top to completely enclose the filling.=
  Continue until all of the mixture is used.  (The rolls can be prepared 1=
  day in advance.  Wrap and refrigerate.)
  Fry the rolls:  If possible use 2 skillets.  Pour 1 to 1 1/2 inches of oil
  into each skillet and heat to 325F.  Working in batches, add some of the
  rolls without letting them touch, or they will stick together. Fry for 10=
  to 12 minutes, turning often, until golden and crisp.  Remove the rolls
  from the oil with tongs and drain on paper towels.  Keep warm in a low oven
  until all of th rolls are cooked.

  To serve, each diner wraps a roll in a lettuce leaf along with some noodles
  and selected items from the Vegetable Platter and dips the package in the
  dipping sauce.

  NOTE:  The fried rolls can be frozen, then thawed and reheated in a 350F
  oven just to crisp and heat through.

  Yield: 40 rolls.

  From “The Foods of Vietnam” by Nicole Rauthier.  Stewart, Tabori & Chang.=
  1989.

  Posted by Stephen Ceideberg; April 14 199ise, then roll up bringing the
   sides in, moistening wrapper edges with egg to seal. ( at this point
   you may cover and refrigerate for up to 8 hours.)
    Into a 2 to 3 quarts pan, pour oil to a dept of 1-1/2in and heat to
   340deg. on a deep frying thermometer. (If using egg rolls, heat to
   360deg.) Add 4 or 5 lumpia; cook, turning as needed, until golden
   brown (2-3 min). Remove with a slotted spoon and drain on paper
   towels; keep warm in a 200deg. oven.  Repeat with remaining lumpia.
   Serve with sweet & sour sauce


                    - - - - - - - - - - - - - - - - - -


 Per serving: 71 Calories; 4g Fat (55% calories from fat); 6g Protein; 2g
 Carbohydrate; 181mg Cholesterol; 882mg Sodium

 NOTES :  Categories: Filipino, Porc, Shrimp, Chestnut
 Yield: 2 doze
Source: Recipe Source
|
Chicken Larb Lettuce Wraps (Larb Gai)
Ingredients2?tablespoons?vegetable oil, plus more as needed 1?clove?garlic, finely chopped 1?pound?ground chicken or?turkey 2?shallots, thinly sliced 1 to 2?Thai red or green chilies, thinly sliced, or to taste Water,?as needed 2?tablespoons?lime juice 2?tablespoons?fish sauce 1?tablespoon?sweet Thai chili sauce 1?teaspoon?brown sugar 1?teaspoon?Sriracha?or sambal oelek 1/4?cup?coarsely chopped?mint leaves 1/4?cup?coarsely?chopped?cilantro 1?head?Boston lettuce?or 2 small lettuce heads, separated into leaves 2?limes, quartered, for serving , for serving Mint, cilantro or?Thai basil sprigs, for serving Extra?Sriracha?or sambal oelek sauce, for serving
MethodCook the chicken: In a skillet over medium heat, heat the oil. Add the garlic and stir for 30 seconds. Add the ground chicken and spread it over the bottom of the pan. Without stirring too much, cook for about 6 minutes or until it browns on the bottom. Turn and break it up with the edge of a spatula. Continue cooking for 6 to 8 minutes longer, or until the meat is browned. Stir in the shallots and chilies and cook for 30 seconds. If the mixture looks dry, stir in some water, 1 tablespoon at a time. Remove the pan from the heat. Add the seasonings: In a small bowl, stir together the lime juice, fish sauce, chili sauce, and brown sugar. Stir the mixture into the meat, along with the chopped cilantro and mint. Serve the larb: Transfer the meat to a serving platter and place lettuce leaves, lime wedges, and more cilantro alongside. Set out a bowl of cooked rice and a bowl of chili sauce. Spoon some rice into each lettuce leaf and top with a spoonful of larb, a squeeze of lime juice, and chili sauce to taste.
Source: Simply Recipes
|
My mother taught me to cook the vegetables and meat in color order to avoid turning lighter vegetables an unusual color, and I do the same. Try to cook them in this order, finishing with the meat. My Mom was pretty much always right about this stuff. IngredientsFor the beef 6?ounces?tender?beef?(strip, rib eye, or?sirloin), sliced against the grain into 1/4-inch thick strips 2?teaspoons?soy sauce 1?teaspoon?rice wine vinegar 1?teaspoon?sugar 1?garlic clove, grated
For the japchae sauce 6?tablespoons?soy sauce 3?tablespoons?sugar 1?tablespoon?toasted sesame oil
To make the japchae 12?ounces?dangmyeon noodles ()? 2?large?eggs 1/4 cup vegetable or canola oil, divided, or as needed 1/2?medium?yellow onion, cut into 1/2-inch slices 1?large?carrot, cut into 3x1/4-inch matchsticks 3?ounces?shiitake mushrooms, stemmed and cut into 1/4-inch slices 1 small (about?3?ounces)?red bell pepper, cored and cut into 1/2-inch slices 6?green onions, trimmed and cut into 2-inch pieces, whites and greens separated 2 cups?baby spinach?(2?ounces) Kosher salt?and freshly ground black pepper, to taste
Toasted sesame seeds, for serving
MethodMarinate the beef: In a medium bowl, combine the beef, soy sauce, rice wine vinegar, sugar, and garlic. Set it aside to marinate while you prepare the noodles. Cook the noodles:? Set a large pot of water to a boil. Cook the noodles according to the package instructions. Drain and rinse under cool running water for a few seconds to make them just cool enough to handle. Do not cool them down all the way. If you have long noodles, use kitchen shears to cut them into 8 to 10-inch lengths.
While the noodles cook, make the japchae sauce: In a large bowl (big enough to do lots of mixing as the rest of the ingredients are added), whisk together the soy sauce, sugar, and sesame oil. Toss the noodles with the sauce: Place your cooked noodles into the japchae sauce and use tongs or salad tossers to mix. When the noodles have cooled enough to touch, I like to use my hands to evenly distribute all the sauce. Taste and adjust for salt and pepper. Set the bowl aside. Make the egg garnish (jidan): Separate the egg whites and yolks into two small separate bowls, and whisk each. Heat a medium nonstick pan over medium heat and add 2 teaspoons vegetable oil. Pour the egg yolks in, tilting the pan back and forth to cover the surface in a thin layer of egg. Cook until the top is just set, but the bottom is not browned. Flip and cook about 10 seconds more. Remove from heat and let cool. Once cooled, slice the egg into thin strips about 1/8 inch wide and about 2 to 3 inches long, and place on the noodles. Cook and slice the egg whites the same way, and place them on the noodles. Cook the vegetables: Heat a large heavy-bottomed skillet or wok over high heat. Cook each vegetable?separately?with 1 teaspoon oil and a pinch of salt until they catch some color and just begin to soften, 2 to 3 minutes. Transfer them to the noodles.? Cook them in the following order: onions, carrots, shiitake mushrooms, red bell pepper, light portion of green onions. Cook the dark green portion of the green onion followed by the spinach?separately?with 1 teaspoon oil and a pinch of salt until barely soft, about 30 seconds or less so that they don’t get watery. Transfer them to the noodles. Cook the meat:? Give the skillet or wok a couple of minutes to fully heat again over high heat. Add 1 teaspoon oil and the marinated meat, leaving behind the marinade in the bowl.? Cook for 2 to 3 minutes, stirring constantly to allow excess moisture to evaporate. Add the cooked meat to the noodles. Finish the japchae and serve:? Toss the noodles with the vegetables, eggs, and beef to combine well. Garnish with sesame seeds and serve. Refrigerate leftover japchae, tightly covered, for 2 to 3 days.
Source: Simply Recipes
|
Ingredients4?large eggs 4?tablespoons?unsalted butter, plus more for greasing the pan 1 (8-ounce) block full-fat?cream cheese 1/4?cup?heavy cream 1/4?cup?sour cream 1/2?cup plus?1/3?cup?granulated sugar, divided 1/4?teaspoon?kosher salt 1 1/2?tablespoons?lemon juice?(from about 1/2 of a lemon) 2?teaspoons?vanilla extract 1/2 cup (60g)?cake flour Powdered sugar, for dusting, optional Berries, for garnish, optional
Special Equipment- 1 (8x3-inch) round cake pan
- Roasting pan
- Stand mixer
MethodPreheat the oven to 325°F and prepare the pan: Place a rack in the center of the oven. Grease the bottom and sides of an 8x3-inch round cake pan with butter.? Cut a sheet piece of parchment paper into 4 strips: two 16 1/2 x 2-inch strips and two 16 1/2 x 4-inch strips. Grease the two 2-inch strips and crisscross them in the center of the pan, greased sides down, so they make an “x” in the bottom of the pan. Press them into the edges and up the sides (this creates a sling that will help you remove the cake from the pan once it is baked).? Line the bottom of the pan with an 8-inch round piece of parchment. Grease one side of each of the 4-inch strips of parchment and wrap them around the inside walls of the pan with the greased sides touching the sides of the pan. They will overlap and create a collar that is higher than the rim of the cake pan. Set aside while you make the cheesecake.
Separate the eggs: Put a kettle or pot of water on to boil. You’ll use this for the water bath later. . Place the egg whites in the bowl of a stand mixer. Place the yolks in a small bowl.
Combine the dairy and sugar: Place a large saucepan with 1 inch of water in the bottom over medium heat and bring to a simmer. In a large, heat-safe bowl (that sits snuggly on top of the saucepan), add the butter, cream cheese, heavy cream, sour cream, 1/2 cup sugar, and salt. Set the bowl over the simmering water. Stir with a whisk until the cream cheese is melted and the mixture is smooth. Remove from the heat.
Finish the cream cheese base: Whisk in the lemon juice and vanilla extract, then whisk in the egg yolks one at a time. Sprinkle cake flour over the batter and whisk to incorporate. Don’t overmix.
Make the meringue: In the bowl of a stand mixer fitted with the whisk attachment, beat the egg whites on medium speed until they become opaque and foamy. Gradually add 1/3 cup sugar while mixing, a spoonful at a time, and continue to beat on medium speed until firm peaks form. If you remove the whisk, the peak will hold upright but the tip will fold back on itself.? Don’t overbeat the meringue, making it crumbly.
Fold in the egg whites: Using a whisk, gently fold 1/3 of the meringue into the cream cheese mixture just until no streaks remain. Be gentle to avoid knocking the air out of the egg whites. Repeat, incorporating a third of the meringue at a time. Pour the batter into the prepared cake pan.
Bake the cheesecake: Place the cake pan inside a roasting pan that will fit the 8-inch pan inside. Place both pans on the middle rack inside your preheated oven. Carefully pour a few inches of hot water into the roasting pan, careful to not get water on the cheesecake, until the water is halfway up the side of the cake pan. Bake the cheesecake until the top is golden brown and set, about 1 hour. Turn off the oven and leave the cheesecake inside for 15 minutes. Crack the oven door slightly (you can use the handle of a wooden spoon if needed) and allow the cheesecake to sit inside for an additional 15 minutes.
Cool and serve the cheesecake: Remove the water bath and cheesecake from the oven. Lift the cheesecake out of the water bath and place it on a wire rack to cool completely to room temperature for an hour.? Using the parchment paper strips, gently lift the cheesecake out of the pan. Peel the parchment off from around the sides. The cheesecake can be served at room temperature or chilled. If desired, sift powdered sugar on the cake before serving. A serrated knife is the best for making clean slices. Refrigerate the cheesecake, covered, for up to 1 week, freeze for up to 1 month. If freezing the cheesecake, defrost overnight in the refrigerator before serving.
Source: Simply Recipes
|
Chinese Tomato Egg Stir Fry
You can use chicken broth in place of the chicken bouillon powder. Add 1/4 cup of broth followed by 2 teaspoons of cornstarch dissolved in 1 tablespoon of water, plus salt to taste. Ingredients1?pound?plum tomatoes (4 to 5) 1?tablespoon?vegetable oil 5?large?eggs, beaten 1?teaspoon?toasted sesame oil 2?teaspoons?chicken bouillon powder 2?teaspoons?sugar 1/2?teaspoon?ground?white pepper 1/4?teaspoon?salt 1?green onion,?trimmed and sliced on a bias, to garnish 2?cups?, for serving, optional
MethodPrepare the tomatoes: Slice the tomatoes in half. Remove the tough stem from each half that connects to the vine. Cut each half into equal thirds (you’ll get 6 slices from each tomato). Make the soft scrambled eggs: In a cold, 8 to 10-inch nonstick skillet, add the vegetable oil and beaten eggs. Turn the heat to medium. Once a thin layer of eggs is just beginning to cook on the bottom, push the eggs in one direction to create layers of scrambled eggs. Cook, gently stirring the whole time, until the scramble eggs are mostly set but still slightly wet and shiny, 2 to 5 minutes. Remove the eggs to a plate and, if needed, wipe out the pan.
Stir-fry the tomatoes and seasonings: Add the sesame oil to the pan followed by the tomatoes and stir-fry over medium heat until the tomatoes are softened but not mushy, about 3 minutes. Add the chicken bouillon powder, sugar, and white pepper. Toss until combined and the sugar and bouillon have dissolved, about 1 minute. Add eggs, stir-fry, and garnish: Add the eggs back to the pan with the tomatoes. Stir-fry for about 2 minutes to heat through and combine. Taste, adding salt only if needed. Sprinkle with the green onions and serve with steamed rice.
Source: Simply Recipes
|
Macie puppy and I would like to wish everyone a very Happy Mother's Day!!!!!
|
Classic Chopped Italian Salad
IngredientsFor the Italian vinaigrette 1?lemon, juiced 1?tablespoon?Dijon mustard 2?tablespoons?red wine vinegar 2?teaspoons?sugar 1?teaspoon?dried oregano 1/2?cup?olive oil 1/4?teaspoon?kosher salt 1/4?teaspoon?black pepper
For the salad 2?heads?romaine lettuce, chopped 1/2?red onion, chopped 1?(15-ounce)?can?chickpeas, rinsed and drained 1?pint?cherry tomatoes, halved 4?ounces?genoa salami, chopped 8?ounces?fresh mozzarella, chopped 1/2?cup?sliced?pepperoncini 1/4?cup?sliced?roasted red peppers 10?fresh?basil leaves, chopped
MethodMaking the dressing:? In a jar with a lid add the lemon juice, mustard, vinegar, sugar, oregano, olive oil, kosher, salt, and black pepper. Add the lid and shake for 10 seconds until all of the ingredients are thoroughly combined. Taste and adjust seasonings to your liking. TipThe vinaigrette can be made in advance and stored in the fridge for up to 1 week. It’s best served at room temperature. The dressing will separate and solidify in the fridge, so run the jar under some warm water and give it a shake to bring the dressing back to room temperature before serving. Make the salad:? Add the chopped Romaine to a large bowl and drizzle with a few tablespoons of dressing. Top the romaine with the red onion, chickpeas, cherry tomatoes, mozzarella, pepperoncini, roasted red peppers and basil. Stir together well before serving. Add more dressing, if desired. Serve:? Serve the salad in bowls on its own or with pasta or pizza for a classic Italian meal. Leftovers and storage: If you are planning to store this salad for later, I would recommend storing it without the dressing.? If you do dress it and have some leftovers, that’s okay—the dressed salad will keep for 1-2 days in the fridge. The greens just wilt pretty quickly once they are dressed.? Did you love the recipe? Leave us stars below!?
Source: Simply Recipes
|
Baked Cherry Tomatoes with Parmesan Topping
Baked Cherry Tomatoes with Parmesan Topping
Ready In:17minsIngredients:6 Nutrition information ingredientsUnits:?US- 2tablespoons?
- 2pints?
- 1teaspoon?
- 1teaspoon?
- 1?4cup chopped?
- 1?4cup freshly grated?
directions- Pour oil into 13x9x2-inch broilerproof ceramic baking dish.
- Add tomatoes, turn to coat with oil.
- Sprinkle with salt and pepper.
- Top with parsley and cheese.
- Preheat oven to 400.
- Bake tomatoes just until plump and shiny but not split, about 10 minutes.
- Preheat broiler.
- Broil until tomatoes begin to split and cheese begins to color, about 2 minutes.
- Serve hot or warm.
Source: Food.com
|
FRIZZLED CABBAGEReady In:25minsingredientsUnits:?US- 1?4medium?
- 2tablespoons??(or more if you are feeling decadent)
salt and pepper
directions - Core and very thinly slice the cabbage.
- Melt the butter in a large skillet (I use non-stick) over medium heat.
- When it is bubbling, add the cabbage.
- Salt and pepper the cabbage.
- Stir occasionally and cook until mostly wilted, about 10 minutes.
- Turn the heat down to medium-low and let cook, stirring frequently, until cabbage is starting to caramelize (brown), about 10 minutes.
- Do not let burn.
- Taste, adjust seasoning, and serve immediately.
Source: Food.com
|
PEACH COBBLERReady In:55minsingredientsUnits:?USBatter- 1?2cup melted?
- 1cup?
1cup? - 2teaspoons?
- 1?4teaspoon?
- 2?3cup room temperature?
- 1room temperature?
Filling- 1(28 ounce) can sliced peaches, drained
- 1cup?
- 1teaspoon?
- 1?2teaspoon?
directions- Melt butter in a 9 x 13 inch pan.
- Mix together flour, sugar, baking powder & salt.
- Stir in milk & egg.
- Pour evenly over melted butter.
- Combine peaches, sugar & spices and spread over batter-DO NOT STIR!
- Bake 35-45 minutes at 350°F until batter comes to the top and is golden brown.
- Serve warm with ice cream.
Source: Food.com
|
Zucchini Lasagna (Lasagne) - Low Carb
Zucchini Lasagna (Lasagne) - Low Carb
Ready In:1hrIngredients:15 Nutrition information ingredientsUnits:?US- 2?1?2cups?, sliced lengthwise 1/4 inch thick (about 2 medium)
- 1?2lb??(I use 1 lb.)
- 1?4cup?, chopped
- 2small?, cut up
- 1(6 ounce) can?
- 1, minced
- 1?2teaspoon?
- 1?2teaspoon?
- 1?4teaspoon?
- 1?4cup?
- 1?8teaspoon?
- 1
- 3?4cup??(or low fat or fat free ricotta)
- 1?2cup?, shredded (I use 8 oz. divided)
- 1teaspoon?
directions
- Cook zucchini until tender, drain and set aside. Fry meat and onions until meat is brown and onions are tender; drain fat. Add next 8 ingredients and bring to a boil.
- Reduce heat; simmer, uncovered 10 minutes or until reduced to 2 cups.
- In small bowl slightly beat egg.
- Add cottage cheese, half of shredded cheese and flour.
- In (1 1/2-qt.) baking-roasting pan arrange half of the meat mixture. Top with half of the zucchini and all the cottage cheese mixture. Top with remaining meat and zucchini.
- Bake uncovered at 375 degrees F for 30 minutes.
- Sprinkle with remaining cheese. Bake 10 minutes longer.
- Let stand 10 minutes before serving.
Source: Food.com
|
AMISH BAKED OATMEALeady In:35minsIngredients:8 Nutrition information ingredientsUnits:?US- 1?1?2cups?
- 1?2cup?
- 1?2cup?
- 1?4cup melted??or 1/4 cup?
- 1
- 1teaspoon?
- 3?4teaspoon?
- 1teaspoon?
directions- Preheat oven to 350 degrees.
- Grease a 13 x 9 x 2 baking pan.
- Combine all ingredients together.
- Spread on prepared baking pan.
- Bake for 25-30 minutes or until the edges are golden brown.
- Immediately spoon into a bowl.
- Top with warm milk, fresh fruit or brown sugar if desired.
Source: Food.com
|
Ingredients- 3 to 4 medium onions, chopped
- 2 cups cold butter, divided
- 1 tablespoon poppy seeds
- 1-1/2 teaspoons salt
- 1-1/2 teaspoons paprika
- 1 teaspoon coarsely ground pepper
- 4 cups all-purpose flour
- 1/2 cup cornstarch
- 1 tablespoon baking powder
- 1 tablespoon sugar
- 1 tablespoon brown sugar
- 5 large eggs, room temperature
- 3/4 cup 2% milk
- 3/4 cup sour cream
Directions- In a large skillet, cook onions in 1/2 cup butter over low heat for 10 minutes. Stir in the poppy seeds, salt, paprika and pepper; cook until onions are golden brown, stirring occasionally. Remove from the heat; set aside.
- In a large bowl, combine the flour, cornstarch, baking powder and sugars. Cut in 1-1/4 cups butter until mixture resembles coarse crumbs. Melt the remaining butter. In a small bowl, whisk the eggs, milk, sour cream and melted butter. Make a well in dry ingredients; stir in egg mixture just until moistened.
- Spread into a greased 10-in. cast-iron skillet or springform pan. Spoon onion mixture over the batter. Place pan on a baking sheet. Bake at 350° until a toothpick inserted in the center comes out clean, 35-40 minutes. Serve warm.
Nutrition Facts1 piece: 539 calories, 36g fat (22g saturated fat), 182mg cholesterol, 748mg sodium, 44g carbohydrate (7g sugars, 2g fiber), 9g protein.
Source: Taste of Home
|
Ingredients- 1 package (1/4 ounce) active dry yeast
- 1/4 cup warm water (110° to 115°)
- 1-3/4 cups warm fat-free milk (110° to 115°)
- 1/3 cup butter, softened
- 1/4 cup mashed potatoes (without added milk and butter)
- 3 tablespoons sugar
- 1-1/2 teaspoons salt
- 1-1/2 cups whole wheat flour
- 3-1/2 to 4 cups all-purpose flour
Directions- In a large bowl, dissolve yeast in warm water. Add the milk, butter, mashed potatoes, sugar, salt, whole wheat flour and 1/2 cup all-purpose flour. Beat until smooth. Stir in enough remaining flour to form a firm dough.
- Turn onto a lightly floured surface; knead until smooth and elastic, 6-8 minutes. Place in a bowl coated with cooking spray, turning once to coat the top. Cover and let rise in a warm place until doubled, about 1 hour.
- Punch down dough and turn onto a floured surface; shape into a loaf. Place in a 9x5-in. loaf pan coated with cooking spray. Cover and let rise until doubled, about 30 minutes.
- Bake at 350° until golden brown, 40-45 minutes. Remove from pan to wire rack to cool.
Nutrition Facts1 piece: 193 calories, 4g fat (2g saturated fat), 11mg cholesterol, 276mg sodium, 33g carbohydrate (4g sugars, 2g fiber), 6g protein.
Source: Taste of Home
|
Ingredients- 2 large potatoes, peeled and cubed (about 2 cups), divided
- 1 medium onion, cubed
- 2 large eggs
- 3 tablespoons all-purpose flour
- 2 tablespoons minced fresh parsley
- 1/2 teaspoon baking powder
- 1/2 teaspoon salt
- 1/2 teaspoon pepper
- 1/4 teaspoon Worcestershire sauce
- 1/8 teaspoon ground nutmeg
Directions- In a blender or food processor, place 1/2 cup potatoes, onion, eggs, flour, parsley, baking powder, salt, pepper, Worcestershire sauce and nutmeg. Process until smooth. Add remaining potatoes and pulse until chopped (2-3 times). Pour by 1/4 cupfuls onto a hot well-oiled skillet or griddle. Fry over medium heat until golden on both sides.
Nutrition Facts3 pancakes: 190 calories, 4g fat (1g saturated fat), 142mg cholesterol, 515mg sodium, 32g carbohydrate (5g sugars, 3g fiber), 8g protein.
Source: Taste of Home
|
Amish Breakfast Casserole
Ingredients- 1 pound sliced bacon, diced
- 1 medium sweet onion, chopped
- 6 large eggs, lightly beaten
- 4 cups frozen shredded hash brown potatoes, thawed
- 2 cups shredded cheddar cheese
- 1-1/2 cups 4% cottage cheese
- 1-1/4 cups shredded Swiss cheese
Directions- Preheat oven to 350°. In a large skillet, cook bacon and onion over medium heat until bacon is crisp; drain. In a large bowl, combine remaining ingredients; stir in bacon mixture. Transfer to a greased 13x9-in. baking dish.
- Bake, uncovered, until a knife inserted in the center comes out clean, 35-40 minutes. Let stand 10 minutes before cutting.
Nutrition Facts1 serving: 273 calories, 18g fat (10g saturated fat), 153mg cholesterol, 477mg sodium, 8g carbohydrate (3g sugars, 1g fiber), 18g protein
Source: Taste of Home
|
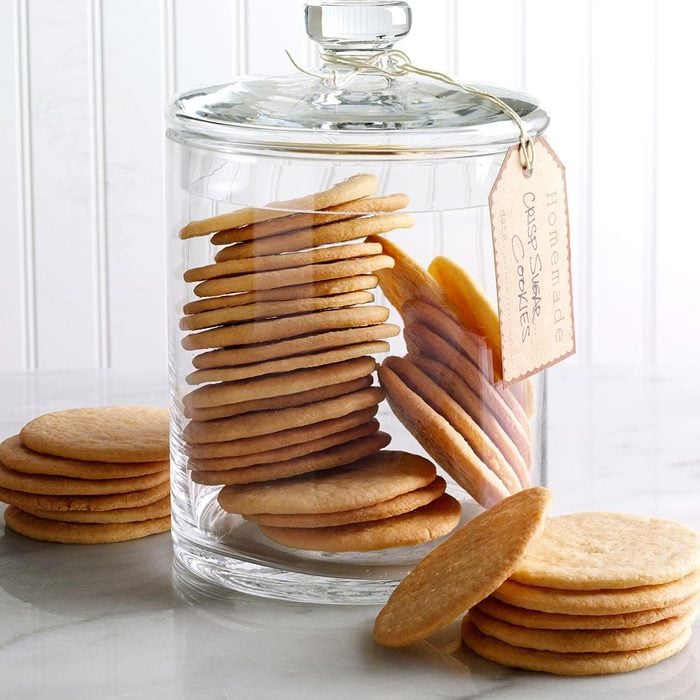
Ingredients- 1 cup butter, softened
- 2 cups sugar
- 2 large eggs, room temperature
- 1 teaspoon vanilla extract
- 5 cups all-purpose flour
- 1-1/2 teaspoons baking powder
- 1 teaspoon baking soda
- 1/2 teaspoon salt
- 1/4 cup 2% milk
Directions- In a large bowl, cream butter and sugar until light and fluffy. Add eggs and vanilla. Combine flour, baking powder, baking soda and salt; add to creamed mixture alternately with milk. Cover and refrigerate 15-30 minutes or until easy to handle.
- Preheat oven to 350°. On a floured surface, roll out dough to 1/8-in. thickness. Cut into desired shapes using a 2-in. cookie cutter. Place 2 in. apart on greased baking sheets.
- Bake 10 minutes or until edges are lightly browned. Remove from pans to wire racks to cool completely.
Nutrition Facts2 each: 117 calories, 4g fat (2g saturated fat), 19mg cholesterol, 105mg sodium, 18g carbohydrate (8g sugars, 0 fiber), 2g protein.
Source: Taste of Home
|
Dark Chocolate Creme Brulee
Dark Chocolate Creme BruleeTreat yourself and your loved ones to the smooth chocolaty taste of a truly luxurious dessert. Dark Chocolate Creme Brulee is a sophisticated combination of vanilla and rich dark chocolate, topped with caramelized sugar. Prep: 20 min | Cook: 50 min | Cool: 7 hr | Yield: 6 servings Ingredients- 1 cup whipping cream
- 1 cup Half-and-Half
- 1/2 teaspoon vanilla extract
- 4 ounces Nestlé? Toll House Chocolatier 53% Cacao Dark Chocolate Baking Bar, broken into small pieces or 2/3 cup Nestlé? Toll House Semi-Sweet Chocolate Morsels
- 4 large egg yolks
- 1/2 cup granulated sugar
- 6 teaspoons granulated sugar, divided
Instructions- Heat oven to 300 degrees F.
- Place cream, Half-and-Half and vanilla extract in large saucepan. Bring to a boil; remove from heat. Add chocolate; whisk until melted and smooth.
- Whisk egg yolks and 1/3 cup sugar in large mixer bowl. Gradually whisk in chocolate mixture.
- Pour mixture through fine sieve into six 4 ounce ramekins or custard cups. Place ramekins in 13 x 9-inch baking dish; fill pan with hot water to 1 inch depth.
- Bake for 40 minutes or until custards jiggle slightly when pan is shaken. Cool custards in water until cool enough to handle. Remove custards from water; refrigerate for 2 hours.
- Cover with plastic wrap; continue to refrigerate for several hours or overnight.
- Heat broiler. Sprinkle 1 teaspoon sugar over tops of each custard. Place custards on baking sheet. Broil for 3 minutes or until sugar is melted and caramelized (rotate pan as needed to prevent burning). Alternately, tops can be caramelized using kitchen torch.
- Refrigerate for 2 hours so that the topping can harden and the custard can cool and set.
NutritionPer serving: Calories: 380 Calories from Fat: 240 Total Fat: 27g Saturated Fat: 16g Cholesterol: 210mg Sodium: 25mg Carbohydrates: 30g Dietary Fiber: 1g Sugars: 25g Protein: 4g AttributionRecipe and photo used with permission from: Nestlé? and Meals.com Source: Recipe Goldmine
|
Chocolate Mint Layer Cake
Chocolate Mint Layer Cake
IngredientsCake - 1 cup Nestlé? mint chocolate chips
- 1 1/4 cups water, divided
- 2 1/4 cups unbleached flour
- 1 teaspoon salt
- 1 teaspoon baking soda
- 1/2 teaspoon baking powder
- 1 1/2 cups brown sugar, firmly packed
- 1/2 cup butter, softened
- 3 large eggs
Chocolate Mint Frosting - 1/2 cup Nestlé? mint-chocolate chips
- 1/4 cup butter
- 1 teaspoon vanilla extract
- 1/4 teaspoon salt
- 3 cups confectioners' sugar
- 6 tablespoons milk
Garnishes - Chocolate Leaves
- Chocolate Curls
- Chocolate Gratings
Instructions- Heat oven to 375 degrees F. Grease and flour two 9-inch round baking pans.
Cake - In a small saucepan, combine mint-chocolate chips and 1/4 cup of the water. Cook over medium heat, stirring constantly, until chips are melted and mixture is smooth; Cool for 10 minutes.
- In medium bowl, combine flour, salt, baking soda, and baking powder; set aside.
- In a large bowl, combine brown sugar and butter; beat until creamy. Add eggs, 1 at a time, beating well after each addition. Blend in chocolate mixture. Gradually beat in flour mixture alternately with remaining 1 cup of water. Pour into prepared baking pans.
- Bake for 25 to 30 minutes, or until cakes test done. Cool completely on wire racks.
- Fill and frost with Chocolate Mint Frosting. Garnish as desired.
Chocolate Mint Frosting - Combine over hot (not boiling) water, the mint-chocolate chips and butter; stir until chips are melted and mixture is smooth. Stir in vanilla extract and salt. Transfer to a large bowl. Gradually beat in the confectioners' sugar alternately with milk; beat until smooth. (if necessary add more milk until desired consistency is reached.
Garnishes - Use chocolate curls and grated chocolate on top of the cake. Form a ring of grated chocolate pieces around the outside edge and use the curls in the center.
- To make chocolate leaves, select several small leaves, wash and dry them and paint one side of them with melted chocolate. Chill until firm and peel the leaf off the chilled chocolate. Use as garnish.
Source: Recipe Goldmine
|