Fresh Strawberry Blondies
Fresh Strawberry Blondies?Prep Time15minutes?minutes ?Cook Time30minutes?minutes ?Total Time45minutes?minutes ?开云体育s9 ?Calories319kcal ?Author - 1/2?cup?diced strawberries
- 1 1/4?cups?all-purpose flour
- 1/2?teaspoon?baking powder
- 1/4?teaspoon?salt
- 1/2?cup?butter, room temperature (not melted)
- 1/2?cup?firmly packed light brown sugar
- 1/2?cup?granulated white sugar
- 1?large?egg
- 1?teaspoon?vanilla extract
For the glaze:- 1?cup?powered sugar
- 2?tablespoons?strawberry jam
- 2?tablespoons?water
Preheat the oven to 350°F and spray an 8x8-inch baking pan with nonstick cooking spray. Set aside. Place the strawberries between several layers of paper towels and press firmly to wick out some of the moisture. Set aside. In a medium bowl, whisk the flour, baking powder, and salt together. Set aside. In a large bowl, stir the butter, brown sugar, and white sugar together. Add the egg and vanilla and stir until incorporated. Add the dry ingredients and stir to combine. Add the strawberries and stir. Spread the mixture into the prepared pan and bake for 28 to 33 minutes or until golden brown and set. Allow to cool completely. Make the glaze by stirring the powdered sugar, strawberry jam, and water together until smooth. Spread over the blondies. Allow the glaze to harden overnight, if desired. Slice and serve. Store in an airtight container at room temperature for up to 3 days or in the refrigerator for up to 5.
Calories:?319kcal?|?Carbohydrates:?53g?|?Protein:?3g?|?Fat:?11g?|?Saturated Fat:?7g?|?Polyunsaturated Fat:?1g?|?Monounsaturated Fat:?3g?|?Trans Fat:?0.4g?|?Cholesterol:?48mg?|?Sodium:?183mg?|?Potassium:?62mg?|?Fiber:?1g?|?Sugar:?39g?|?Vitamin A:?346IU?|?Vitamin C:?5mg?|?Calcium:?35mg?|?Iron:?1mg
Source: Southern Bite
|
Cherry Coconut Pecan Bars
Cherry Coconut Pecan Bars?Prep Time20minutes?minutes ?Cook Time30minutes?minutes ?开云体育s12?bars ?Author For the shortbread crust:- 2?cups?all-purpose flour
- 6?tablespoons?powdered sugar
- 1?cup?cold unsalted butter
For the filling:- 2?cups?sugar
- 4?large?eggs, beaten
- 4?tablespoons?cornstarch
- 1/2?teaspoon?salt
- 2?teaspoons?vanilla extract
- 1?cup?sweetened coconut flakes
- 1 1/2?cups?chopped pecans
- 1?cup?chopped maraschino cherries
Preheat the oven to 350°F. Use a mixer to combine the butter, flour, and powdered sugar. Drop the dough by dollops into a metal 9x13-inch baking pan. Press evenly - using hands sprayed with cooking spray if the dough is sticky. Bake for 25 minutes or until just golden brown around the edges. While the crust is baking, in large bowl, mix the sugar, eggs, cornstarch, salt, vanilla, coconut, pecans , and cherries together, Pour the filling mixture over the hot shortbread crust. Lower the oven temperature to 325° and bake for 30 minutes or until light golden brown. Cool completely before slicing into squares.
Source: Southern Bite
|
Chocolate Cherry Pistachio Pecan Cookies
Chocolate Cherry Pistachio Pecan Cookies?Prep Time20minutes?minutes ?Cook Time18minutes?minutes ?Total Time38minutes?minutes ?开云体育s16?4-inch cookies ?Author - 1?cup?unsalted butter, slightly softened
- 1 1/2?cups?firmly packed dark brown sugar
- 1?large?egg
- 1?teaspoon?vanilla extract
- 1 1/2?cups?all-purpose flour
- 3/4?teaspoon?baking power
- 1/2?teaspoon?baking soda
- 1/2?teaspoon?salt
- 1 1/2?cups?quick-cooking oats
- 1?cup?dried cherries, coarsely chopped
- 1/2?cup?coarsely chopped pecans
- 1/2?cup?roasted pistachios
- 1?cup?semi-sweet chocolate chips
- flake salt
Preheat the oven to 350°F and line a cookie sheet with parchment paper. Use a mixer to cream the butter and brown sugar together - about 1 minute. Add the egg and vanilla and mix to combine. In another bowl, whisk together the flour, baking powder, baking soda, and salt. Ad the dry mixture to the butter mixture and mix on low to combine. Add the oats and mix to combine. Add the cherries, pecans, pistachios, and chocolate chips. Mix to combine. Use a 1/4 cup dry measuring cup to portion the dough out into 16 to 18 equal portions. Roll the dough into a ball (about 2-inches) and place it on the baking sheet. Space the dough balls about 3 inches part and press each ball to about 1 inch thick. Sprinkle with a generous pinch of flake salt. Bake for 15 to 18 minutes or until the edges are brown but the center of each cookie still is shiny/wet. Cool on the baking sheet for 5 minutes before sliding the parchment, with the cookies on it, to a wire rack to cool completely. Work in batches to bake all the cookies. Store in airtight container.
For that gourmet look, place an additional 1/2 cup each of the pecans, pistachios, and cherries and in a small bowl. Once the dough balls have been formed, press them into the nut mixture and place back on the baking sheet - ensuring the dough is about 1 inch thick - then bake as directed.?
Source: Southern Bite
|
Easy Almond Cookies?Prep Time25minutes?minutes ?Cook Time10minutes?minutes ?Total Time35minutes?minutes ?开云体育s36?cookies ?Author - 1?cup?unsalted butter, room temperature
- 1 1/2?cups?sugar
- 1?large?egg
- 2 1/4?cups?all-purpose flour
- 1/2?teaspoon?baking powder
- 1/2?teaspoon?salt
- 2?teaspoons?almond extract
For the drizzle:- 1?cup?powdered sugar
- 1?teaspoon?almond extract
- 3?tablespoons?heavy cream
- 1/2?cup?toasted sliced almonds
Preheat the oven to 350°F and line a cookie sheet with parchment paper or a nonstick baking mat. Use a mixer to cream the butter and sugar together. Add the egg and mix well. In a medium bowl, whisk the flour, baking powder, and salt together. Add the flour mixture to the butter mixture and mix on low until combined. Add the almond extract and mix well. Use a cookie scoop to place about 1 tablespoon scoops of the dough on the cookie sheet about 3 inches part. Bake for 8 to 10 minutes or until just starting to brown on the edges. Cool on a wire rack.
For the drizzle:In a small bowl, stir together the powdered sugar, almond extract, and heavy cream. Add additional heavy cream if it's too thick or additional powdered sugar if it's too thin to drizzle. Drizzle the mixture over the cookies and sprinkle the toasted sliced almonds over the tops. Allow to dry before stacking.
Source: Southern Bite
|
Homemade Brownies: The Best From Scratch Recipe
Homemade Brownies?Prep Time20minutes?minutes ?Cook Time30minutes?minutes ?Total Time50minutes?minutes ?开云体育s9 ?Calories466kcal ?Author - 3/4?cup?unsalted butter
- 1 1/2?cups?granulated sugar
- 3?large?eggs?(room temperature)
- 1/2?teaspoon?salt
- 1/2?cup?unsweetened cocoa powder
- 1?cup?all-purpose flour
- 1?cup?semi-sweet chocolate chips
- 1?teaspoon?vanilla extract or flavoring
Preheat the oven to 325°F and spray an 8x8-inch metal baking pan with nonstick cooking spray or line it with parchment paper. Set aside. Place the butter in a large bowl and cover the bowl with paper towels. Microwave until the butter is melted and very hot. (Butter has a tendency to splatter in the microwave as the water particles get super hot and explode, so keep it covered.) Add the sugar to the melted butter and whisk for about 2 minutes. Add the eggs and continue to whisk for another minute. Add the salt, cocoa powder, and flour to the mixture. Stir until just combined. Add the chocolate chips and vanilla and stir until just combined. Spread the batter into the prepared pan and bake on the center rack of the oven for 25 to 30 minutes or until the center of the brownies is just set. Cool before slicing and serving. Store leftovers at room temperature in an airtight container.
I recommend using a light colored metal pan for these brownies for even baking. However, if you must use glass, reduce the oven temp to 300°F and increase the cook time from anywhere to 10 to 15 minutes or until cooked through.? Calories:?466kcal?|?Carbohydrates:?57g?|?Protein:?6g?|?Fat:?25g?|?Saturated Fat:?15g?|?Polyunsaturated Fat:?1g?|?Monounsaturated Fat:?7g?|?Trans Fat:?1g?|?Cholesterol:?104mg?|?Sodium:?159mg?|?Potassium:?230mg?|?Fiber:?4g?|?Sugar:?41g?|?Vitamin A:?573IU?|?Calcium:?35mg?|?Iron:?3mg * If nutritional values are provided, they are an estimate and will vary depending on the brands used. The values do not include optional ingredients or when ingredients are added to taste.
Source: Southern Bite
|
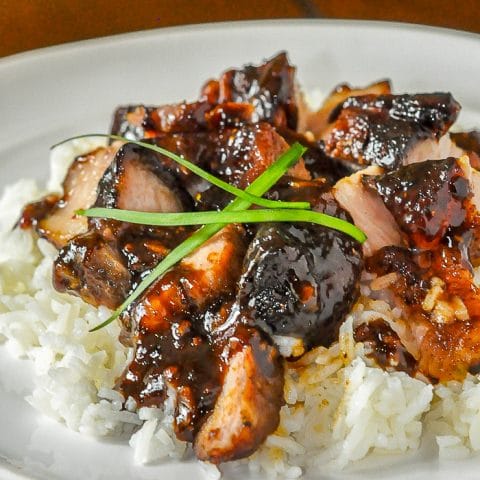
Yield: 8 servings or more Asian Glazed Pork BellyAsian Glazed Pork Belly. A little sweet, a little sticky, a little salty and a little spicy and so deliciously satisfying. Slow cooked to tender, silky perfection. Prep Time10 minutes Cook Time4 hours Total Time4 hours?10 minutes Ingredients- 3 lbs pork belly (approximately)
- 1/4 cup hoisin sauce
- 2 tsp chilli flakes
- 1/4 cup low sodium soy sauce
- 1/4 cup honey
- 1 tbsp fish sauce
- 1 1/2 tsp Chinese 5 spice powder
- 2 tbsp rice vinegar
- 1 tsp black pepper
- 1 tbsp grated fresh ginger
Instructions- It is important to ?get a piece of pork belly that is a?uniform?thickness so that it cooks evenly. Try to get a piece that is about 3 inches thick. If thinner pieces are all that is available, I usually stack them and tie them with pieces of butcher string after the meat has marinated. (As in the photo shown)
- Mix all of the ingredients in the marinade together and pour over the pork belly in a large Ziploc Bag.
- Marinate in the fridge for several hours or overnight.
- Preheat the oven to 275 degrees F.
- Place the pork belly on a roasting rack and roast for 4-5 hours depending upon the thickness of the meat.
- Reserve the marinade and pour it into your smallest saucepan. You can add all the same ingredients again to make extra sauce/glaze for rice or noodles at this point if you like.
- Lowly simmer the marinade until it begins to become like a thin syrup; about maple syrup consistency.
- In the last couple of hours of?roasting. begin to brush on layers of the glaze. I do this 4-6 times about every 20 minutes, to build ?good flavourful. sticky glaze on the pork belly.
- Let the pork belly rest for about 15 minutes before slicing and serving. I also like to dice it in small bite sized chunks to serve over rice.
NotesI like to trim the outermost layer of rind/skin off of pork belly, especially when slowly open roasting because it can become quite tough. It is also best to roast with the fattiest side up. Source: Rock Recipes
|
|
|
|
|
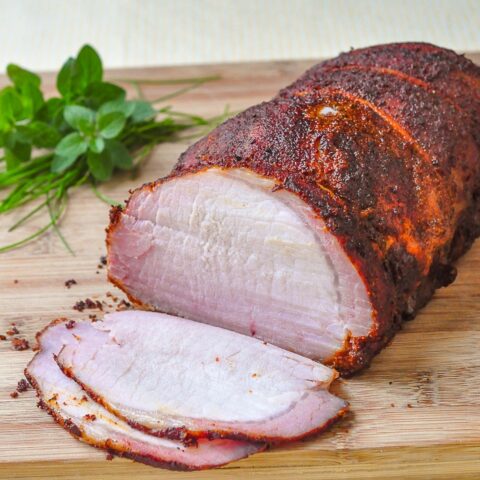
Smoked Pork Loin with Summer Spice Dry Rub
Yield: 12 servings Smoked Pork Loin with Summer Spice Dry RubSmoked Pork Loin with Summer Spice Dry Rub - tender, juicy, thinly sliced, smoky pork with a tasty blend of herbs & spices. Makes delicious cold cuts too. Prep Time1 day Cook Time3 hours Total Time1 day?3 hours Ingredients- 4 pound center loin pork roast
- 4-6 tbsp Smokin' Summer Spice Barbecue Dry Rub (approximately, use as much as you like)
- 6 cups water
- ? cup brown sugar
- 2 tsp salt
- 3 cloves chopped garlic
- 2 tbsp black peppercorns
- 2 fresh thyme sprigs
Instructions- Mix all of the brine ingredients together until the brown sugar and salt have dissolved.
- Place loin roast in a plastic or glass container and pour the brine over the top of the meat. The brine should cover the meat entirely.
- Place in the fridge and let stand for 24-48 hours.
- Pat the meat dry with paper towels. Liberally cover the loin roast with?. You can then leave the roast for 2-8 hours before smoking if you like to let the flavour of the spices permeate the meat. How long is your choice.
- Barbecue over indirect heat at 250 degrees F for up to 3 hours or longer depending on the size/thickness of the roast you are using. The best way to ensure your pork loin is fully cooked is to use a meat thermometer to ensure the center reaches 160 degrees F. Any higher than that, you risk losing moisture from the meat. This temperature is what is recommend by health Canada. In the US the guideline is 140 degrees F or higher. I've used both temps in the past and both may leave the pork slightly pink at the centre which is considered perfectly fine these days.
NotesWhile I do have a backyard smoker, any BBQ can be adapted to add a little smoke flavour using readily available hardwood chips. See below. SOME SUGGESTIONS FOR INDIRECT BBQ If you are using your gas grill to slow barbecue your pork, place the meat on one side of the grill and use the burner or burners on the opposite side so that it is not directly over heat. Regulate the gas to keep the temperature at about 250 degrees F for slow barbecued flavour. The same technique can also be used with a charcoal grill, just keep the charcoal on one side and the meat on the opposite side. You can add smoke flavour by soaking hardwood chips like mesquite, apple, cherry or hickory in warm water for about a half hour. A couple of handfuls will do. Wrap the soaked wood chips in a double layer of heavy duty aluminum foil and poke only two holes in the foil, one at either end to allow the smoke to escape. On a gas grill, I place the foil packets in a vegetable grill pan so that the packet is not sitting directly on the gas burner. On a charcoal grill, simply toss the packet directly onto the hot coals. You can add more soaked wood chip packets as they burn out, it all depends on how much smoke favor you wish to add. One or two of these packets replaced every hour should be enough for pork. Source: Rock Recipes
|
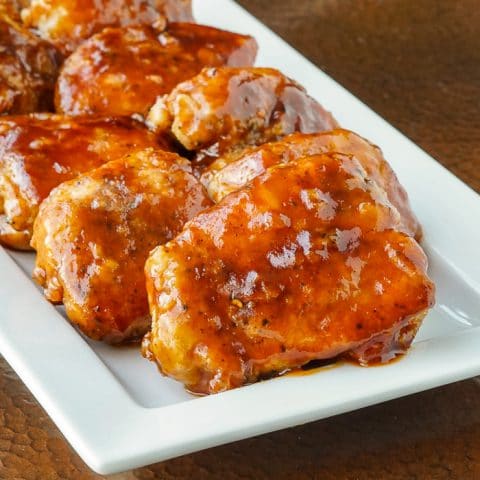
Honey Garlic Barbecue Chicken
Yield: 6 servings Honey Garlic Barbecue ChickenHoney Garlic Barbecue Chicken using a lower fat oven baked method plus a seasoning secret you'll love to make an easy but utterly delicious chicken dinner. Prep Time20 minutes Cook Time40 minutes Total Time1 hour Ingredients- 2 to 3? lbs of boneless skinless chicken thighs or breasts (see notes for using breasts below)
- 4 tbsp BBQ Seasoning (Approximately)
- 1 cup flour (approximately)
- 3 tbsp canola oil
- For the sauce
- 2 tbsp olive oil
- 4 cloves minced garlic
- 1/2 cup honey
- 1 cup BBQ Sauce
- 1/2 tsp chili flakes (optional)
- pinch salt
- 1/2 tsp black pepper
Instructions- Preheat oven to 400 degrees.
- Line a baking sheet with parchment paper and brush the canola oil over the parchment paper.
- Lay the boneless skinless breasts flat on a cutting board and liberally season with the BBQ spice rub on both sides.
- Fold them in half and dredge in the flour until completely coated. ( They should remain folded while dredging in the flour)
- Bake for about 45 minutes, turning the chicken pieces over at the 20 minute mark.
- Test the pieces with a meat thermometer to see if they have reached 170 degrees F. Check earlier than the 45 minute mark if they are small chicken pieces. They may well be fully cooked before that time.
- To prepare the sauce.
- Add the olive oil and garlic to a small saucepan.
- Cook over medium low heat until the garlic just softens but does not brown. About a minute.
- Add the honey and let it come to a slow simmer for a few minutes.
- Add the BBQ sauce, chili flakes if using them, plus the salt and pepper.
- Simmer together slowly for 5 minutes or so, stirring often.
- Dip the cooked pieces in the sauce and serve.
NotesIf using boneless skinless chicken breasts, pound them out to a uniform thickness or butterfly cut them to make them flatter. You can then fold them in half before dredging in the flour, so that they will be seasoned inside and out, the same as thighs? would be. Chicken breasts may cook faster than chicken thighs, depending up on their thickness. Use a meat thermometer to determine when any chicken pieces are fully cooked to 170 degrees F. Source: Rock Recipes
|
Easy Korean BBQ Short Ribs
Yield: 4 lbs ribs. 6-8 servings. Easy Korean BBQ Short RibsEasy Korean BBQ Short Ribs. (Galbi) An unusual secret ingredient produces velvety tender restaurant style beef short ribs. Just a few common ingredients yield sweet, sticky, smoky, delicious ribs. Prep Time10 minutes Cook Time8 minutes Additional Time12 hours Total Time12 hours?18 minutes IngredientsFor the marinade- 2 tsp baking soda
- 1/3 cup light soy sauce
- 2 tsp smoked paprika (or regular paprika if you prefer.)
- 6 cloves garlic minced
- 1 tbsp grated fresh ginger (Use 1/2 tsp powdered ginger if you are in a [inch)
- 2/3 cup water
- 2 tablespoons toasted sesame oil. (the golden colour version in small bottles at the supermarket or Asian market)
- 1/3 cup firmly packed brown sugar
- 1/3 cup vinegar (any kind really)
- 1 1/2 tbsp cracked black pepper
- 1 tsp chili flakes (Optional, or adjust to taste.)
Instructions- Place all of the ingredients for the marinade into a large stainless steel or glass bowl or container.
- Stir well to ensure the sugar and baking soda are dissolved well in the liquid.
- Add the ribs to the marinade.
- Cover and leave to marinate in the fridge overnight or for up to 24 hours in advance.
- I like to toss them around in the marinade a couple of times during the marinating time, to ensure even seasoning of the beef.
- I find that most of the marinade gets absorbed by the meat, so don't let that worry you of it happens.
- Preheat grill to about 400 degrees F.
- Add the marinated ribs to the grill, close cover and cook for about 4 minutes. (check for flame ups after 2 minutes.
- Flip the ribs and cook fo about an additional 3-4 minutes, depending on the thickness of the ribs.
- Serve with a garnish of green onions, chives, and/or chili flakes. Great with a side salad or some plain sticky rice.
NotesNote: There is actually no salt added to this recipe. The soy sauce is all that is needed to penetrate the meat and season it well. Source: Rock Recipes
|
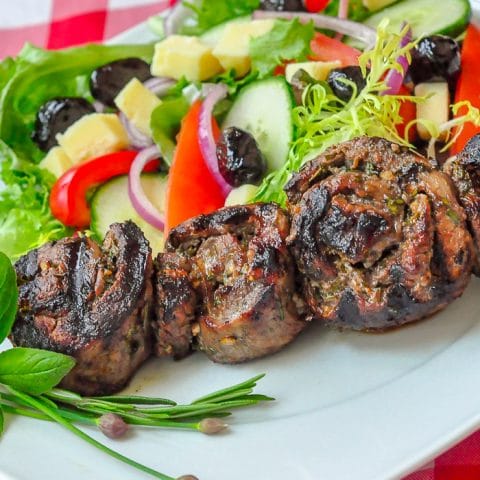
Herb and Garlic Rolled Steak Medallions
ield: 6 servings Herb and Garlic Rolled Steak MedallionsHerb and Garlic Rolled Steak Medallions - a delicious method for infusing herb and garlic flavours into grilled steak. Prep Time25 minutes Cook Time10 minutes Total Time35 minutes Ingredients- 8 thin cut strip loin steaks
- 6 tbsp Worcestershire sauce
- 4 cloves minced garlic
- 4 tbsp chopped rosemary
- 4 tbsp chopped oregano
- 4 tbsp chopped chives
- ? tsp freshly grated nutmeg, (optional)
- 6 tbsp melted butter
Instructions- Marinate the steak in the Worcestershire sauce for only 10 to 15 minutes before preparing the rolled steak medallions.
- Mix together the garlic, rosemary, oregano, chives and nutmeg.
- Season the steaks lightly on both sides with salt and pepper lay them flat on a cutting board and rub the herb and garlic mixture onto the surface of the steaks.
- Starting at the narrowest end roll the steak up tightly. Cut the steak roll into as many medallions as you want, usually 2 or 3 depending on the size of the steak you use.
- Working with 3 or 4 of the medallions at a time, lay them flat on a cutting board in a straight line and push one of the soaked skewers horizontally through the center of the medallions.
- Brush both sides of the medallions with the butter and transfer them to a hot preheated grill. Grill for 2- 4 minutes per side depending on if you want them rare to well done. When cooked, let the medallions rest for 4 or 5 minutes on a serving plate, covered in aluminum foil before serving.
Source: Rock Recipes
|
Homemade Bourbon BBQ Sauce
Homemade Bourbon BBQ SauceFlavored with a splash of smoky bourbon whiskey, this homemade BBQ sauce is the perfect partner for your favorite grilled and roasted meats. It only takes a half hour to make and keeps for up to 2 weeks in the fridge. Prep Time5minutes?mins Cook Time25minutes?mins Total Time30minutes?mins Course:?Condiments Cuisine:?American 开云体育s:?18?servings ?Author:?Lynne Webb - 2?tablespoons?butter
- 2?tablespoons?grated sweet onion
- 1?clove?garlic?finely minced or pressed
- 1?cup?ketchup?(see notes)
- 1/3?cup?brown sugar
- 1/4?cup?bourbon?or Tennessee whiskey
- 1/4?cup?apple cider vinegar
- 1?teaspoon?Worcestershire sauce
Makes about 2 cupsMelt the butter in a medium-sized saucepan over medium heat. Add the onion and cook until softened, 3 to 4 minutes. Add the garlic and continue cooking, stirring often, until soft and aromatic, about 2 minutes longer. Stir in the ketchup, brown sugar, bourbon, cider vinegar, and Worcestershire sauce and bring the mixture to a slow simmer. Cook for 18 to 20 minutes, stirring often, until the sauce is thickened and glossy.
ABOUT THE KETCHUP:?Look for a brand of ketchup made with cane sugar instead of high fructose corn syrup. Cane sugar thickens more effectively when simmered, helping the sauce develop the right consistency. It will also caramelize better when applied to meat.HOW TO STORE:?Homemade BBQ sauce can be stored in the refrigerator for up to 2 weeks. It can also be frozen for up to 3 months. Let the sauce cool completely before transferring it to a tightly sealed container.Food safety note:?Always use a clean spoon when you dish up barbecue sauce to prevent contamination and preserve shelf life. Never use a utensil that has touched raw meat unless you plan to use up the sauce at that time and thoroughly cook the food you're applying it to. 开云体育:?2tablespoons?|?Calories:?43kcal?|?Carbohydrates:?6g?|?Fat:?1g?|?Saturated Fat:?1g?|?Cholesterol:?3mg?|?Sodium:?76mg?|?Sugar:?5g
Source: MyGourmetConnection
|
Thai Mango Curry DuckLoaded with the fragrant flavors of Thai cuisine, this savory coconut curry recipe is made with chunks of tender duck breast and fresh mango. Prep Time10minutes?mins Cook Time25minutes?mins Total Time35minutes?mins Course:?贰苍迟谤é别蝉 Cuisine:?Asian 开云体育s:?4?servings ?Author:?Lynne Webb - 4?boneless duck breasts Pekin/Long Island?or 1 pork tenderloin - see notes
- 1?tablespoon?coconut or vegetable oil
- 4?cloves?garlic?minced
- 1?red bell pepper?seeded and sliced into thin strips
- 1-1/3?cups?coconut milk
- 1-1/2 to 2?tablespoons?red curry paste?see notes
- 1-1/2?tablespoons?fish sauce
- 1?tablespoon?sugar
- 2?tablespoons?freshly squeezed lime juice
- 2?mangoes?peeled, pitted, and cut into chunks
- 2?scallions?chopped
- 2?tablespoons?chopped fresh cilantro
- 4?servings cooked Jasmine rice
Being careful not to cut into the meat, score the skin on each duck breasts in a crosshatch pattern at 1/4-inch intervals. Season both sides with salt and pepper. Place the duck breasts, skin side down in a heavy frying pan over medium heat (about 275°F) to render the fat. You want to see the fat begin to melt and sizzle slightly, but you are not trying to achieve a quick sear at this point. Without turning, continue cooking the duck for 6 to 10 minutes, or until the majority of the fat has rendered from the breast and the skin is golden brown and crisp. Once the duck skin is crisp, pour off the fat and turn the breasts over. Raise the heat slightly and continue cooking until an instant-read thermometer inserted into the thickest part of the breast registers 125°F (medium-rare), 3 to 6 minutes. Transfer the duck breasts to a cutting board and allow them to rest for 10 minutes before cutting into 1/4-inch thick slices. While the duck is cooking, add the coconut milk, curry paste, fish sauce, sugar, and lime juice to a bowl and whisk until smooth and well blended. Taste and add more curry paste if desired. Set aside. Return the pan you cooked the duck to the stove over medium-high heat. Add the minced garlic and red bell pepper strips and stir-fry just until the garlic is fragrant, 1 minute. Stir in the coconut milk mixture and bring it to a slow simmer. Cook for 5 minutes, stirring often, then add the mango and scallions. Return the duck to the pan, coat in sauce, and simmer just long enough to heat through. To serve, plate individual portions of jasmine rice, duck, mango, and bell pepper. Spoon some sauce over each serving and garnish with chopped cilantro. Transfer the remaining sauce to a serving bowl to pass at the table.
Pork tenderloin variation:Pork tenderloin can be substituted for the duck in this recipe. Here's how to prepare it:- Trim the silverskin from the tenderloin, quarter it lengthwise and cut it into bite-sized chunks.
- Season lightly with freshly ground black pepper and a pinch of salt.
- Add a small amount of oil to a frying pan and place over medium-high heat.
- Add the pork and stir fry until lightly browned on the outside and rosy pink inside. Do not overcook.
- Remove from the pan and proceed with the balance of the recipe as written.
About Thai red curry paste:How much curry paste you add to this dish is a matter of taste that depends on the brand you use and how spicy it is.There are a number of brands of pre-made Thai curry paste on the market. Our favorite is called Aroy-D, a product of Thailand that can be purchased in Asian grocery stores or online from Amazon or?ImportFood.com.Calories:?443kcal?|?Carbohydrates:?48g?|?Protein:?19g?|?Fat:?20g?|?Saturated Fat:?15g?|?Polyunsaturated Fat:?3g?|?Cholesterol:?56mg?|?Sodium:?673mg?|?Fiber:?4g?|?Sugar:?28g
Source: MyGourmetConnection
|
Vietnamese Style Meatball Noodle Soup
Vietnamese Style Meatball Noodle SoupTender chicken meatballs, thin rice noodles and broth flavored with classic Vietnamese soup ingredients like star anise, ginger and lime combine to make this light yet satisfying main dish soup. Prep Time10minutes?mins Cook Time40minutes?mins Total Time50minutes?mins Course:?Soups Cuisine:?Vietnamese 开云体育s:?4?servings ?Author:?Lynne Webb - 6?cups?low-sodium broth
- 3?whole star anise
- 3?whole cloves
- 1?cinnamon stick
- 1-1/2?tablespoons?fish sauce?or soy sauce
- 1/2 to 1?teaspoon?sriracha
- 2?tablespoons?freshly squeezed lime juice
- 2-?inch?piece of fresh ginger?peeled
- 3?cloves?garlic?peeled
- 4 to 5?scallions?sliced
- 2?tablespoons?fresh cilantro?chopped
- 8?ounces?fine rice noodles
- 4?lime wedges
For the meatballs:- 1?pound?ground chicken
- 2?tablespoons?panko crumbs?for gluten-free use crushed Rice Chex
- 2?tablespoons?cornstarch
- 2?teaspoons?fish sauce
- 1?tablespoon?freshly squeezed lime juice
- 1?clove?garlic?minced
Combine the chicken broth, star anise, cloves, cinnamon stick, fish sauce, sriracha and lime juice in a stockpot over medium heat. Slice the ginger into 1/4-inch thick pieces and smash them gently with the flat side of a knife. Do the same with the garlic, add both to the broth and bring it to a slow simmer. Cover and cook for 30 minutes. While the broth simmers, combine the ground chicken, panko, cornstarch, fish sauce, lime juice and garlic in a mixing bowl. Form the mixture into 1-inch meatballs and set aside. Tip: This mixture is very sticky. Wet your hands in cool water to make rolling the meatballs easier. Place the rice noodles in a large bowl and cover with hot water. Allow to soak until soft and pliable, 10 to 12 minutes, drain and divide between four serving bowls (see notes). Using a large slotted spoon, remove the spices, ginger and garlic from the broth and turn up the heat to bring it to a rapid simmer. Begin adding meatballs, a few at a time, letting each batch cook for about 1 minute before adding more. Continue simmering until the meatballs are cooked through, 6 to 7 minutes. To finish, top each bowl of noodles with a portion of the scallions and cilantro. Ladle the meatballs and broth over top. Add a lime wedge and serve immediately.
Fine rice noodles will usually soften nicely in hot water, but be sure to check the package on your noodles as directions vary. 开云体育:?1serving?|?Calories:?477kcal?|?Carbohydrates:?45g?|?Protein:?39g?|?Fat:?17g?|?Saturated Fat:?5g?|?Polyunsaturated Fat:?11g?|?Cholesterol:?132mg?|?Sodium:?1618mg?|?Fiber:?4g?|?Sugar:?8g
Source: MyGourmetConnection
|
Quick and Easy Moo Shu Pork
Quick and Easy Moo Shu PorkWhip up this 30-minute version of Moo Shu Pork at home with easy-to-find ingredients like boneless pork chops, store-bought coleslaw mix, mushrooms, scallions, and flour tortillas. Prep Time20minutes?mins Cook Time10minutes?mins Total Time30minutes?mins Course:?贰苍迟谤é别蝉 Cuisine:?Asian 开云体育s:?4?servings ?Author:?Lynne Webb - 3/4?lb?boneless pork loin chops
- 2?teaspoons?toasted sesame oil
- Vegetable oil
- 6?cloves?garlic?minced
- 1?tablespoon?minced ginger
- Freshly ground black pepper
- 8?low-carb flour tortillas (8-inch)
- 2?eggs?lightly beaten
- 8?ounces?cremini or white button mushrooms?sliced
- 5?cups?store-bought coleslaw mix?see notes
- 3?scallions?sliced
For the sauce:- 1/3?cup?hoisin sauce
- 2?tablespoons?rice vinegar
- 2?tablespoons?low-sodium soy sauce
- 2?tablespoons?oyster sauce
Place the pork chops between two sheets of plastic wrap, gently pound to a thickness of about 1/4-inch, then slice them across the grain into thin strips. Transfer the pork to a mixing bowl, drizzle with sesame oil and 1 tablespoon of vegetable oil. Add the garlic, ginger, and a pinch of black pepper and combine well. Set aside for 15 minutes. While the pork marinates, combine the hoisin sauce, rice vinegar, soy sauce, and oyster sauce in a measuring cup or small bowl and set aside. Wrap the tortillas tightly in foil and place in a warm oven (275°F) to soften. Preheat a wok or large frying pan over medium-high heat, add 1 tablespoon of vegetable oil and swirl to coat the pan. Add the eggs and stir-fry until soft-scrambled, about 30 seconds. Break into small pieces, transfer them to a small bowl, and set aside. Return the pan to the stove, add the pork, and stir-fry for about 2 minutes until no longer pink on the outside. Transfer to a plate and set aside. Coat the pan with another tablespoon of vegetable oil and add the mushrooms. Stir-fry until lightly browned, 2 minutes. Add the coleslaw mix (or cabbage) and stir-fry 1 to 2 minutes until wilted. Stir in the sauce and return the pork to the pan. Stir in the eggs and scallions, heat for 1 minute, then transfer to a serving bowl. Serve family-style, letting each person fill their tortillas and roll as desired.
Ready-made coleslaw mix is available in the produce section of most supermarkets, but you can replace it with thinly shredded cabbage and one large carrot cut into julienne strips.Tips for SuccessPrepare and organize your ingredients before you begin cooking:?The French call this mise en place, which, when roughly translated, means "set up" or "put in place." This is a good practice no matter what you're cooking, but it's particularly important for stir-fries to prevent overcooking any of the components.Choose the right size pan:?If you use a conventional frying pan for this dish instead of a wok, be sure it is large enough to allow ample room for moving the ingredients around as they cook. An overcrowded pan will "sweat" the ingredients and prevent proper searing of the pork and/or alter the desired crisp-tender texture of the veggies. Calories:?293kcal?|?Carbohydrates:?22g?|?Protein:?26g?|?Fat:?11g?|?Saturated Fat:?3g?|?Polyunsaturated Fat:?3g?|?Monounsaturated Fat:?4g?|?Trans Fat:?0.1g?|?Cholesterol:?140mg?|?Sodium:?1012mg?|?Potassium:?787mg?|?Fiber:?4g?|?Sugar:?11g?|?Vitamin A:?299IU?|?Vitamin C:?37mg?|?Calcium:?86mg?|?Iron:?2mg
Source: MyGourmetConnection
|
Spicy Asian Shrimp TacosFilled with a crisp napa cabbage slaw and jumbo shrimp stir-fried with garlic and ginger, these spicy shrimp tacos make a flavorful, light dish that's perfect for a weeknight dinner. Prep Time30minutes?mins Cook Time5minutes?mins Total Time35minutes?mins Course:?贰苍迟谤é别蝉 Cuisine:?Fusion 开云体育s:?4?servings ?Author:?Lynne Webb - 24?extra-jumbo shrimp?peeled, deveined, tails removed
- 3?cups?chopped napa cabbage?firmly packed
- 1?medium carrot?shredded
- 4?tablespoons?vegetable oil?divided
- 2?teaspoons?sugar?divided
- 1?tablespoon?garlic?minced
- 1?tablespoon?fresh ginger?minced
- 1?tablespoon?rice vinegar?or more to taste
- Salt and freshly ground black pepper
- 1/4?cup?mayonnaise
- 2?teaspoons?sriracha
- 1-1/2?tablespoons?lime juice
- 1/4?cup?finely chopped cilantro
- 2?scallions?sliced
- 8?flour tortillas?small, 8-inch
Place the napa cabbage and shredded carrots in a mixing bowl. Add 2 tablespoons of the oil, 1 teaspoon of the sugar and 1/2 teaspoon each of minced garlic and ginger. Drizzle with the rice vinegar, season to taste with salt and pepper and combine well. Set aside until ready to assemble the tacos. Add the shrimp to a separate bowl and combine with the remaining garlic and ginger. Drizzle with the remaining 2 tablespoons of oil, season lightly with salt and pepper and toss to combine. Set aside. Combine the mayonnaise with the sriracha and remaining teaspoon of sugar and stir until the sugar has dissolved. Set aside. Heat a wok or large frying pan over high heat and add the shrimp mixture. Stir fry until pink and opaque, 3 to 4 minutes. Quickly deglaze the pan with the lime juice, add the cilantro and scallions, toss to combine and remove from the heat. To assemble the tacos, place about 1/3 cup of slaw in the center of each tortilla, top with 3 to 4 shrimp and drizzle each with about 2 teaspoons of sriracha mayo. Serve immediately.
Calories:?602kcal?|?Carbohydrates:?63g?|?Protein:?17g?|?Fat:?32g?|?Saturated Fat:?4g?|?Polyunsaturated Fat:?25g?|?Cholesterol:?69mg?|?Sodium:?1001mg?|?Fiber:?4g?|?Sugar:?3g
Source: MyGourmetConnection
|
German Apple Cake (Wiener Apfelkuchen)
German Apple Cake (Wiener Apfelkuchen)IngredientsFor the Crust: 1 2/3?cups? 1?tablespoon?sugar 1/2?teaspoon?baking powder 9?tablespoons?(4 1/2 ounces) cold?unsalted butter 1?large?egg, room temperature, beaten with 1 tablespoon water
For the Apple Filling: 2 1/4?pounds?, peeled, cored, and quartered 1/2?lemon, juiced
For the Cake: 13?tablespoons?(6 1/2 ounces)?unsalted butter, room temperature 2/3?cup?sugar 1?large?egg, room temperature 3/4?cup?all-purpose flour 1/2?teaspoon?baking powder 15?tablespoons?
For the Topping: 4?tablespoons?sugar 2?tablespoons?sliced?almonds
For the Pan: 1?tablespoon?unsalted butter, room temperature 2?tablespoons?, or all-purpose flour
Steps to Make ItMake the CrustGather the crust ingredients. Whisk together flour, sugar,?and baking powder in a medium bowl. Cut in cold butter for pie dough until small crumbs form. Use 4 to 6 tablespoons of the egg-water mixture to moisten the crumbs. Stir just until the mixture forms a ball. Wrap in plastic and refrigerate 30 minutes.
Make the Cake BatterGather the batter ingredients. Cut each quarter apple into 3 long pieces, then cut crosswise into small trapezoids. Sprinkle with lemon juice, toss and set aside. Beat together softened butter with sugar in a mixing bowl until light and fluffy. Beat in egg and lemon zest. Whisk together flour with baking powder (and a dash of salt if using unsalted butter) in a separate small bowl. Add to creamed butter mixture alternately with whipping cream and beat until smooth. Set aside.
Assemble and Bake the CakePreheat oven to 350F. Butter an?11-inch??and sprinkle with breadcrumbs or flour, shaking out excess. Roll out the crust and line the pan, piecing crust as necessary to form a 1- to 1 1/2-inch lip. Place drained apple slices in the crust. Spoon cake batter over apple slices as if setting dumpling batter on a stew, then smooth over apples to edges. Sprinkle 2 tablespoons almond slices then 4 tablespoons granulated sugar evenly over batter. Bake for 1 hour in the preheated oven, then turn off the oven and leave the cake for another 15 minutes. The crust should be golden brown and filling should be moist?but set. Allow cake to cool completely in the pan for best taste. Serve with?. Refrigerate any leftovers.
Source: The Spruce Eats
|
Ingredients1?(24-ounce) can?beer 6? 2?teaspoons?thyme 1/4?cup?brown sugar, divided 2?tablespoons? 1?tablespoon?salt 1?tablespoon?freshly?ground black pepper 2?tablespoons?ketchup 2?tablespoons? 2?teaspoons?hot sauce 1?teaspoon?cayenne pepper 1?(15-pound/7-kilogram)?whole turkey
Steps to Make ItGather the ingredients. Empty the can of beer into a container. Cut off the top of the can and pour in 12 ounces of beer. Add the bay leaves and thyme. Set aside. Make the rub by combining 2 tablespoons brown sugar with the paprika, salt,?and pepper. Make the turkey baste. In a separate bowl, combine the remaining 2 tablespoons?, the ketchup, vinegar, 2 tablespoons of beer, hot sauce, and cayenne. Prepare smoker for a 6-hour smoke at 250 F. Rub surface of the turkey?. Try to get as much as you can under the skin, particularly over the breast meat.
Stand beer can up on the smoker grate and gently set the turkey over the can so that the can is completely inside the cavity of the turkey. Make sure that the turkey stands easily and doesn't sway. The turkey needs to be stable. Once you have the turkey in the smoker, let it cook for about 6 hours at a temperature around 250 F. Baste the turkey with the basting mixture every 2 hours during ?the?cooking process.?Check for an internal temperature in the thigh of about 165 F/74 C. This is when the bird is done. When cooked, remove from heat and let sit for a few minutes before carving. Serve and enjoy.
What kind of beer works best for beer can turkey?Whenever you use any kind of alcohol in a recipe, it should always be something you would normally enjoy drinking. Beer is no exception, but if your favorite is something strong-flavored or quite distinctive, you may want to choose one that is more middle-of-the-road like a lager. TipIf you're worried about the turkey toppling over in the smoker, you can place the can in a baking pan (disposable is fine) and then place the turkey on top. Put the pan directly onto the smoker grates.
Source: The Spruce Eats
|
French Fries on the Grill With Cheese and Bacon
French Fries on the Grill With Cheese and Bacon“A real creative way to cook up your frozen fries. It’s nice to have the aluminum foil to cook them in so there’s less clean up later. Just make sure to keep an eye on your fries, a grill's heat varying can leave them pretty burnt if you’re not careful.” —Noah Velush-Rogers Ingredients1?(14-ounce) bag?frozen french fries 1?tablespoon?unsalted butter, melted 1/2?pound?bacon,?cut into small pieces, or premade bacon bits 6?slices?yellow American cheese 1/4?cup?thinly sliced?fresh chives Ketchup, optional Mayonnaise, optional
Steps to Make ItGather the ingredients. In a medium bowl, toss the frozen french fries with the melted butter.?? Portion french fries onto 3 sheets of aluminum foil, trying to space them out as much as possible in one layer. Create a "boat" around the fries with a large opening on top to allow steam to escape. Place french fry boats on a grill heated to medium-high (400 F to 475 F) Close lid and cook until crisp, about 5 minutes. Flip french fries and cook until the other sides are crisp, another 5 minutes. Set aside. Meanwhile, if making the??from scratch, place a cast-iron skillet on grill. Add bacon and cook, stirring frequently, until crisp, 20 to 24 minutes. Transfer bacon to a paper towel to drain. Top fries in each packet with 2 slices of cheese and 1/3 of the bacon bits. Place foil packets back on grill, close lid, and cook until cheese has melted, about 5 minutes.?? Top with the chives. Serve with ketchup and/or mayonnaise, if desired.
Tips- It is very important that the frozen fries are not crowded in the foil pouches; if they are piled on top of each other, they will steam and become soggy instead of crisping up. Make sure to place them in one layer.
- Another way to ensure the fries will crisp up is to keep the top of the aluminum foil boat open; again, closing it will create an environment for the frozen french fries to steam.
Source: The Spruce Eats
|